Baked Salmon with Hatch Chile Butter

The fresh green chiles have been available for a couple of weeks but now it’s time to get serious. The roasters have been set up outside my grocery store, ready to scorch case after case of hatch chiles. They are easy enough to roast at home… but they’re also easy enough to buy a bag […]

Baked Salmon with Hatch Chile Compound Butter

The fresh green chiles have been available for a couple of weeks but now it’s time to get serious. The roasters have been set up outside my grocery store, ready to scorch case after case of hatch chiles.

They are easy enough to roast at home… but they’re also easy enough to buy a bag of fresh-roasted-by-someone-else chiles and take them home to chop and freeze.

Or mix into a stick of butter and top baked salmon. Or scatter over pepperoni pizza. Or blend into homemade ranch dressing.

Focus, Shawnda. Butter.

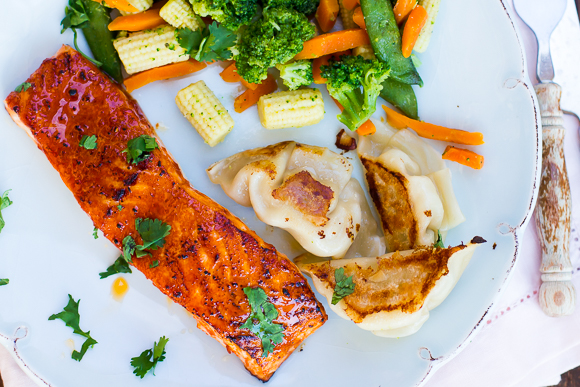
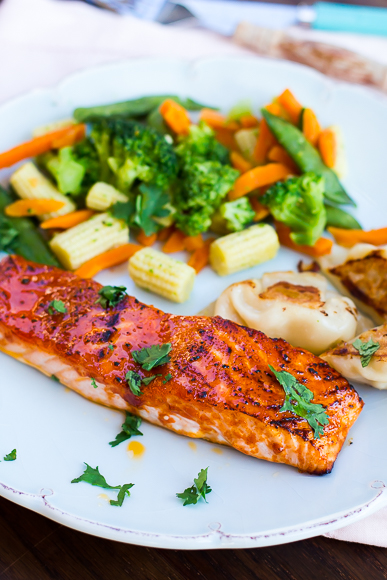
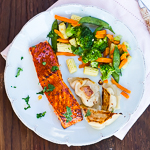
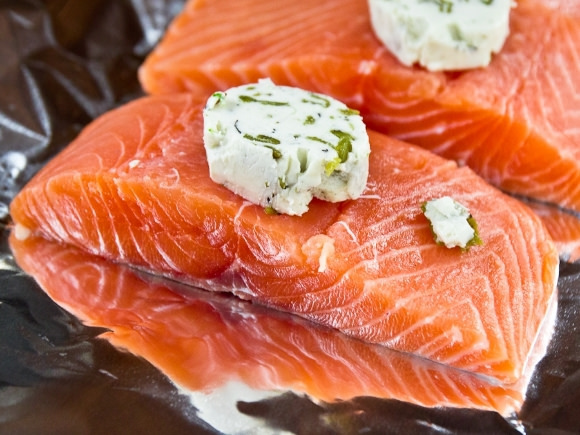
Chopped hatch chiles are mixed into softened butter with salt, pepper, and a squeeze of lime juice. The smokey chiles and tangy lime juice in the compound butter bake up wonderfully over salmon or tilapia. And when you consider that it takes 20 minutes to put dinner on the table and clean-up involves balling up a sheet of foil, I dare you not to make it twice a week.

Baked Salmon with Hatch Chile Compound Butter

Baked salmon topped with hatch chile and lime compound butter

Ingredients

  • 4 salmon filets
  • Cooking oil/spray
  • For the hatch chile butter (makes enough for two recipes)
  • 1 stick (8 Tbsp) unsalted butter, softened
  • 4 hatch chile peppers, roasted, seeded and chopped
  • Juice from 1-2 lime wedges
  • Salt
  • Pepper

Instructions

  1. Preheat the oven to 400 and line a baking pan with foil.
  2. Lightly oil or spray the foil.
  3. In a bowl, combine the softened butter, chopped hatch chile peppers, squeeze of lime juice, a pinch of salt, and a few grinds of black pepper.
  4. Top each salmon filet with ~1 Tbsp of the butter mixture.
  5. Spoon the remaining butter mixture onto a piece of plastic wrap, lightly roll up, and then pick up the ends of the plastic wrap and spin to seal - this will form a "butter cylinder." It's the second best kind of cylinder
  6. The butter will keep in the fridge for a couple of weeks, easily.
  7. Bake the salmon for 10-12 minutes until the salmon is just still translucent in the very center of the thickest part of the fillet.
  8. While the fish is cooking, microwave some steam-in-bag veggies and open a bottle of wine.
  9. Serve.

Notes

Yields: 4 servings

Source: The Brewer and The Baker

Estimated time: 20 minutes

Honey & Thyme-Glazed Chicken and Apricot Skewers

If you need another excuse to cook dinner on the patio and work in a little more grilled summer fruit into your diet, you’ve come to the right place. I am the enabler’s enabler. One of my very favorite things right now are grilled peaches, plums, and apricots. They work perfectly with a scoop of […]

Grilled Honey-Thyme Chicken and Apricot Skewers

If you need another excuse to cook dinner on the patio and work in a little more grilled summer fruit into your diet, you’ve come to the right place.

I am the enabler’s enabler.

One of my very favorite things right now are grilled peaches, plums, and apricots. They work perfectly with a scoop of ice cream on top and work just as beautifully in savory dishes.

Another current favorite thing is stuffing my face while standing in my PJs at the fig tree in the backyard… but that’s a confession for another day.

Honey & Thyme-Glazed Chicken and Apricot Skewers

Chicken thighs and ripe apricots (or white peaches – those turned out amazing!) are threaded onto skewers and grilled to smokey perfection before being glazed with an herbed honey glaze. The glaze gets the tiniest of kicks from the red pepper. It’s not spicy but without the red pepper, I thought the glaze fell a little flat the first time we made it.

Happy summer grillin’!

Honey & Thyme-Glazed Chicken and Apricot Skewers

Chicken and apricot skewers grilled with a sweet and spicy honey-thyme glaze.

Ingredients

  • 1/4 cup honey
  • 1 Tbsp chopped thyme leaves
  • 1 pinch red pepper flakes
  • 1 Tbsp water
  • Kosher salt
  • Pepper
  • 1 1/2 lbs boneless skinless chicken thighs, cut into 1-inch wide strips
  • 4 apricots, halved or quartered (depending on size) and pitted
  • 8 long skewers, soaked in water for 30 minutes if wooden
  • Olive oil, for brushing

Instructions

  1. Heat the grill to medium-high heat.
  2. Mix the honey, thyme, red pepper flakes, a pinch of salt and black pepper with 1 Tbsp water in a small bowl.
  3. Microwave for 15 seconds, stir, and microwave for another 15 seconds. Set the honey aside to steep.
  4. Lightly spray or brush skewers with oil.
  5. Divide the chicken strips and apricot halves or quarters equally between the skewers.
  6. Lightly spray or brush with oil and place on the grill.
  7. Cook ~4 minutes per side, turning once.
  8. Baste with honey mixture and cook another 1-2 minutes per side, coating with more honey when turning.
  9. Serve drizzled with leftover honey mixture.

Notes

Yields: 4 servings

Adapted from Food & Wine

Estimated time: 30 minutes

Gochujang and Honey-Glazed Salmon

Gotcha-what? I know, I know. STAY WITH ME HERE. This sweet & spicy & tangy 10-minute dinner is totally worth it. So totally worth it. If you’ve made the Spicy Honey-Glazed Salmon before, you know exactly what I’m talking about. Gochujang is a paste made from spicy red peppers (and a few other things) and […]

Gochujang and Honey-Glazed Salmon

Gotcha-what? I know, I know. STAY WITH ME HERE. This sweet & spicy & tangy 10-minute dinner is totally worth it.

So totally worth it.

If you’ve made the Spicy Honey-Glazed Salmon before, you know exactly what I’m talking about.

Gochujang and Honey-Glazed Salmon

Gochujang is a paste made from spicy red peppers (and a few other things) and has the same consistency as tomato paste. So, kind of like tomato paste… if tomato paste was made out of 1-part fire.

I couldn’t find it locally so I picked up this tube on Amazon.

And by “couldn’t find it,” I mean I ran down the International Aisle and kinda looked in the general area while my hand was burning-cold, holding a half-gallon of Blue Bell.

Priorities.

Gochujang and Honey-Glazed Salmon

Like the Spicy Honey-Glazed Salmon, sweet + heat is good… but it can be better. The glaze really benefits from the added acid of (there) cider vinegar. Here, I added the juice of half a lime to balance out the heat and honey. The glaze still has a kick, but not one that forces you to guzzle milk from the jug standing in front of an open fridge.

The real beauty of either of these salmon recipes is that not only are they insanely delicious, but they’re also insanely easy and double-insanely FAST. 7 minutes under the broiler and your entree is done. While the salmon was cooking, I tossed a steam-in-bag Asian veggie medley into the microwave and fired up a non-stick pan to heat some potstickers.

And it’s really hard to beat crumble-up-foil-and-throw-it-away as your clean up instructions.

Gochujang and Honey-Glazed Salmon

A quick & easy broiled salmon with a sweet, spicy, and tangy glaze made with gochujang, honey, and lime.

Ingredients

  • Olive oil
  • 1 lb salmon, cut into 4 filets
  • 1 tbsp Gochujang paste
  • 1 Tbsp honey
  • 1 Tbsp soy sauce or coconut aminos
  • Juice of 1/2 lime
  • 1/2 tsp toasted sesame oil
  • 1 small cloves garlic, minced
  • 1-inch piece of fresh ginger, peeled and grated
  • Chopped cilantro for serving

Instructions

  1. Preheat the broiler and line a baking sheet with foil.
  2. Lightly spray/brush olive oil over the foil.
  3. In a small bowl, whisk together the gochugang, honey, soy, lime juice, sesame oil, garlic, and ginger.
  4. Broil the salmon for 3 minutes.
  5. Brush the salmon with the glaze and broil for 2 minutes.
  6. Brush with the remaining glaze and broil another 2 minutes.
  7. You're done.
  8. Seriously.

Notes

Yields: 4 servings

Adapted from Skinny Taste

Estimated time: 10 minutes

Posts can contain affiliate links.

Pressure Cooker French Dip Sandwiches

Those who know me, know that I’m a sucker for a few things: A “new” trendy diet I mean, most of them aren’t new by any stretch… so maybe let’s call them repackaged diets. But as long as it’s trendy and getting press, I’m gonna juice whatever refuse I can find on my back patio […]

Intsant Pot French Dip Sandwiches au Jus

Those who know me, know that I’m a sucker for a few things:

A “new” trendy diet
I mean, most of them aren’t new by any stretch… so maybe let’s call them repackaged diets. But as long as it’s trendy and getting press, I’m gonna juice whatever refuse I can find on my back patio for the sake of checking some dumb box. I mean, whether it’s eating only orange foods (Ranch is okay as long as it’s stuck to a carrot, right?), shunning meat (just kidding – I’d never), “eating” things only if they can be sucked through a straw, or eating only things that were available before the creation of spoken language… I’ll give anything a try once. Just for the heck of it.

Instant Pot French Dip Sandwiches au Jus

Scarves
I live in Katy, Texas, where the “need” for scarves is maybe 10 out of 365 days in a “cold” year. I have more than 10 scarves.

Modern technology (aka BUY ALL OF THE GADGETS!!)
And that’s where these sandwiches come in. My friend Brandi bought an Instant Pot – it’s an electric pressure cooker that does a bunch of other things, too. The very next day, I showed up on her doorstep with a 4lb pork roast, a Dr Pepper, a bottle of Gatlin’s barbecue sauce, and a package of Hawaiian rolls.

We seared the roast right in the pot (a dream of mine!), set it to Pressure for 90 minutes, and by the time we had made a dent in the cheese plate and a couple of bottles of wine, it was dinner time. Dinner that tasted like it had cooked for 8-10 hours. I was sold. Sooooo sold. Like, ordered-one-for-myself-sitting-right-there-on-her-couch-eating-a-pulled-pork-slider, sold.

And now that my shiny new pressure cooker is here, I decided to give it an inaugural spin on one of my (and your) all-time favorite slow cooker recipes: French Dip Sandwiches.

Instant Pot French Dip Sandwiches au Jus

In the slow cooker, we’re talking 6 hours minimum. In the Instant Pot? 10 minutes of prep, 40 minutes of cooking at pressure, 15-20 minutes of resting, and another 10-15 minutes to shred the meat and build sandwiches.

Pressure Cooker French Dip Sandwiches au Jus

Pressure-cooked French Dip Sandwiches au Jus - the same slow-cooker tenderness in a fraction of the time.

Ingredients

  • 4 lb boneless chuck roast
  • Salt
  • Pepper
  • 1 Tbsp oil
  • 1/2 medium yellow onion, sliced
  • 3/4 cup beef or chicken stock (chicken is usually all I ever have in the freezer)
  • 2 Tbsp coconut aminos or soy sauce
  • 1 tsp fish sauce (optional, but I'm obsessed)
  • 2 Tbsp water
  • 1 Tbsp Worcestershire sauce
  • 1 Tbsp creole (or other spicy brown) mustard
  • 2 cloves garlic, smashed
  • 8 sandwich rolls, split
  • 8 slices of cheese

Instructions

  1. Cut the roast in half and liberally salt and pepper the top and bottom sides.
  2. Set the pot to Saute and heat 1 Tbsp oil.
  3. Sear 1 piece of roast at a time, ~3 minutes on each side. Move to a plate when done.
  4. Add the sliced onions and the garlic and cook until softened.
  5. Turn the pot off.
  6. Add the two halves of the roast on top of the onions.
  7. Stir together the stock, soy sauce, fish sauce, water, Worcestershire sauce, and creole mustard.
  8. Pour over the roast, lock the lid in place, and set the vent to Seal (not Vent).
  9. Set the pot to High Pressure for 45 minutes.
  10. After the pot beeps to let you know the cooking cycle is done, it will take another 15-20 minutes to "naturally" release the pressure (the cylinder next to the vent will drop, indicating that it is done).
  11. Shred the meat and build the sandwiches.
  12. Strain the liquid and discard as much of the fat as possible (I have a "gravy defatter" that works pretty well - leftovers are even easier because the fat will solidify on the top and you can just scoop it off the next day).
  13. Serve a small bowl of the drippings on the side of your sandwiches.

Notes

Yields: 8 servings

Source: The Brewer and The Baker

Estimated time: 1 hour 20 minutes

Spring Garden 1.0

First broccoli of the season! #oldladygardengram A photo posted by Shawnda (@shawndah) on Apr 9, 2016 at 7:55am PDT Howdy! It’s your 6th-favorite slacker blogger checking in with her vegetable garden details. And a super sweet announcement: my momma got her new kidney this week! She and my little sister (the donor) are both back […]

First broccoli of the season! #oldladygardengram

A photo posted by Shawnda (@shawndah) on

Howdy!

It’s your 6th-favorite slacker blogger checking in with her vegetable garden details. And a super sweet announcement: my momma got her new kidney this week! She and my little sister (the donor) are both back home already and doing great.

What’s also doing great? The broccoli and brussels sprouts.

I have two 4×8 garden boxes going again this year. They look like this:

Box 1
6 broccoli
6 brussels sprouts
1 square of came-back-from-last-year green onions
3 San Marzano tomatoes
3 Julie tomatoes

Box 2
1 Jalapeno
1 Red bell pepper
1 Green bell pepper
2 slicing tomatoes
2 San Marzano
2 Juliet tomatoes

Out and around the backyard:
Young citrus trees:
– Lime
– Key lime – back from the brink of death but didn’t blossom this season. I still have my fingers crossed.
– Meyer lemon – This guy is still in recovery, it actually blossomed but I didn’t let it fruit.
– Tangerine
– Ruby grapefruit
– Blood orange – big, bush, and zero blossoms this season.
– Satsuma Orange
– Pink lemon – Almost completed recovery, it blossomed but I didn’t let it fruit.
Peach (white peach, yellow peach)
Celeste Fig – it is going to be a HUGE year for figs 😀

Not listed for the first time in 5 years: Pomegranate. RIP, man.

School Night Eats: Skinny Orange Chicken

Quick. Easy. Not horrible for you. Quick. Did I mention it was quick? My favorite “recipe” for orange chicken is one that someone else makes and shows up at my door step in 35-45 minutes with a minimum $15 order. A minimum that I almost always double because the guy on the other end of […]

Skinny Orange Chicken

Quick. Easy. Not horrible for you. Quick.

Did I mention it was quick?

Skinny Orange Chicken

My favorite “recipe” for orange chicken is one that someone else makes and shows up at my door step in 35-45 minutes with a minimum $15 order. A minimum that I almost always double because the guy on the other end of the call has eggrolls and a wonton soup that make a killer lunch the next day. That orange chicken is spicier and more savory than the usual orange chicken. (A feat I know is achieved by adding a bunch of red pepper and extra fat to the usual orange chicken.) (Sooooo worth it.)

My second favorite recipe is not the at-home “so much better than take out” version that involves breading and frying, a million ingredients to make the sauce, and ending with a kitchen that looks like a just spent the day cooking Thanksgiving dinner. And let’s not forget about the bonus morning-after-frying smell that is now permanently embedded in every strand of your hair.

My second favorite recipe is a quickly whipped-up, stripped-down version created out of desperation. It requires a handful of ingredients, leftover chicken, and… that’s it. In minutes, you have a sauce with a bright citrusy punch and a light kick that marries perfectly with chicken and rice.

Skinny Orange Chicken

Semi-pro tip: There are three things you’ll always find in my fridge or freezer: a repurposed wonton soup container of lime juice, frozen rice, and already-cooked chicken breast for “emergencies.” (These days, that seems to basically be every weeknight.) Maybe I’m totally on my game (ha) and planned ahead (all of the LOLs) by cooking a large package of bone-in chicken breasts in the crockpot… or maybe I’ve just hit up Costco and splurged on the package of rotisserie chicken breast.

Skinny Orange Chicken

A healthier alternative to take-out with a fresh, bright sauce that packs a citrusy punch.

Nutritional info:
Calories: 353 | Fat: 6g | Fiber 0g | Protein 40g | Carbs 33g

Ingredients

  • ~1 lb cooked chicken, sliced or shredded
  • 2 cups cooked rice
  • 4 small oranges for zest and 1 cup orange juice
  • 1/2 tsp sesame oil
  • 1/2 tsp of fish sauce (optional, I add it if I have it)
  • 2 garlic cloves, minced
  • Pinch of red pepper flakes
  • Black pepper
  • 2 Tbsp ketchup (I use a reduced sugar version)
  • 1 Tbsp soy sauce or coconut aminos
  • 1 tsp cornstarch or arrowroot powder
  • Sliced green onions, for topping.

Instructions

  1. Use a vegetable peeler to remove the zest in long strips from 1 orange. Slice the strips into thin slices.
  2. If you don't have an emergency bag of rice in the freezer, cook 1 cup rice (to yield 2 cups) according to package directions.
  3. In a medium sauce pan, heat the sesame oil, garlic cloves, red pepper flakes (two pinches of you aren't sharing with any Littles), and black pepper over medium heat until it begins to sizzle.
  4. Add the orange zest, 1 cup orange juice, the ketchup, fish sauce, and the soy sauce/coconut aminos. Stir until uniform, increase the heat, and bring to a boil for 2-3 minutes.
  5. In a small cup, mix the cornstarch/arrowroot powder with 1 tsp water.
  6. Stream into the sauce while whisking.
  7. Turn off the heat and add the chicken, tossing to coat.
  8. Serve over cooked rice with a sprinkling of green onions, next to something green.

Notes

Yields: 4 servings

Source: The Brewer and The Baker

Estimated time: 20 minutes

Sriracha Honey Lime-Glazed Brussels Sprouts

Year of the Monkey? Nope. 2016 is absolutely shaping up to be the Year of the Brussels Sprout. (Although there was definitely a time when I thought eating a monkey sounded far more appetizing than eating Brussels Sprouts.) (Because seriously. Mushy, boiled Brussels Sprouts? [shudder]) But then something amazing happened. People stopped boiling them to […]

Sriracha Honey Lime-Glazed Brussels Sprouts

Year of the Monkey? Nope.

2016 is absolutely shaping up to be the Year of the Brussels Sprout. (Although there was definitely a time when I thought eating a monkey sounded far more appetizing than eating Brussels Sprouts.)

(Because seriously. Mushy, boiled Brussels Sprouts? [shudder])

Sriracha Honey Lime-Glazed Brussels Sprouts

But then something amazing happened. People stopped boiling them to mush.

Our friends served them at NYE dinner – halved, simply roasted and seasoned under very high heat, rendering them super-caramelized and tender. And then a neighborhood friend brought them shredded-and-roasted-and-glazed to a get-together and since then, I’ve spent the last two months making up for lost time.

A photo posted by Shawnda (@shawndah) on

Sriracha Honey Lime-Glazed Brussels Sprouts

The house-favorite way is to make them like Friend #2: shredded, roasted long enough to get lots of little crispy shredded pieces, and then tossed in a sweet-sour-spicy glaze. (Although “the bacon way” comes in a very close second.)

A couple of weeks ago, I made this recipe four times on a Sunday – four pans full – and by Thursday afternoon, I was adding brussels sprouts to my shopping list again.

Sriracha Honey Lime-Glazed Brussels Sprouts

Crispy-roasted brussels sprouts glazed with a sweet-sour-spicy mixture of honey, lime, and sriracha.

Ingredients

  • 1 Tbsp olive oil
  • 12 oz bag shredded brussels sprouts*
  • Black pepper
  • 1 Tbsp soy sauce or coconut aminos
  • 1 Tbsp sriracha
  • Juice of 1/2 lime
  • 1 Tbsp honey
  • You can also use whole sprouts, cut in half. Be sure to cook them cut side-down to make the magic happen.

Instructions

  1. Preheat oven to 375 and line a baking pan with foil.
  2. Place the brussels sprouts in a large zipper bag with olive oil and pepper - seal (no seriously - triple check that it is sealed) and shake to coat.
  3. Spread the brussels sprouts in a single layer and roast for 20 minutes, toss, and cook another 5 minutes if you want them darker.
  4. In a medium bowl, whisk together the soy, honey, lime, and sriracha. If you keep most of those ingredients in the fridge, a 10-second trip through the microwave will make mixing easier.
  5. Transfer the brussels sprouts to the bowl and toss to coat with the glaze.
  6. Serve warm.

Notes

Yields: Makes 3 side-servings

Source: The Brewer and The Baker

Estimated time: 30 minutes