Eggplant Lasagna

This eggplant lasagna recipe layers eggplant, homemade marinara, and a flavorful three-cheese filling! It’s a hearty dinner that pleases everyone.…

A Couple Cooks – Recipes worth repeating.

This eggplant lasagna recipe layers eggplant, homemade marinara, and a flavorful three-cheese filling! It’s a hearty dinner that pleases everyone.

Eggplant Lasagna

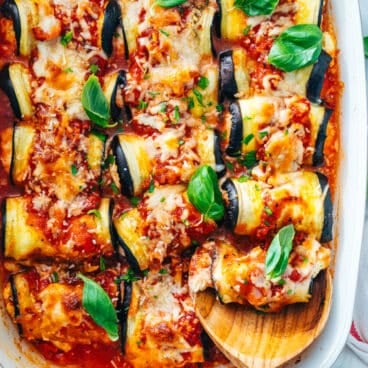
Got eggplant and want to turn it into a meal? Try this Eggplant Lasagna, a tasty dinner recipe that swaps out the traditional noodles for roasted eggplant! This gooey pan holds layers of eggplant, homemade marinara, and a flavorful three-cheese filling. Lemon zest and nutmeg takes it to restaurant-style flavor. It’s a hearty gluten-free and meatless dinner idea that everyone will love! This one’s now in our regular rotation to stay.

Ingredients for eggplant lasagna

Eggplant lasagna is a gluten-free version of lasagna that swaps the noodles for roasted lasagna. It’s similar to a classic Eggplant Parmesan, but skips the breading breading on the eggplant. You’ll slice the eggplant into planks, then use that for layering with the marinara and three-cheese filling. Here are the ingredients you’ll need:

  • Eggplant
  • Olive oil
  • Garlic
  • Butter
  • Crushed tomatoes and tomato sauce
  • Fresh thyme
  • Dried basil, dried tarragon, ground nutmeg, and kosher salt
  • Cornstarch
  • Lemon zest
  • Ricotta, Parmesan and mozzarella cheese
Eggplant Lasagna

The tricks to eggplant lasagna

The biggest issue with lasagna recipes without noodles like eggplant lasagna is that eggplant is 90% water. Raw eggplant would make the dish into a watery mess! So there are a few tricks to making eggplant lasagna with the perfect consistency:

  • Roast the eggplant. This cooks out a significant amount of the water, making for the perfect tender consistency. You’ll roast at 425°F for about 25 minutes total.
  • Thicken the tomato sauce with cornstarch. This is another preventative measure! Adding a little cornstarch makes an even thicker tomato sauce with less water.
  • Let the lasagna cool for 15 minutes to set. Right out of the oven, there may be a little moisture. Let the lasagna sit and cool, which lets it absorb any remaining moisture.
Eggplant Lasagna Recipe

A few flavor secrets

This eggplant lasagna tastes restaurant-quality with just a few special items to make the ingredients sing! We recommend making the recipe with each of these ingredients:

  • Ricotta, Parmesan, and mozzarella cheese: Using three types of cheese brings a nuance in flavor. Use whole milk mozzarella if you can find it: it melts better than part-skim cheese.
  • Homemade tarragon tomato sauce: You could use store-bought marinara sauce in a pinch, but this tomato sauce is incredible! Substitute oregano if you don’t have dried tarragon.
  • Lemon zest and fresh thyme: These bring a zing and freshness that’s absolutely essential to the flavors.

Make ahead & leftover storage for eggplant lasagna

This eggplant lasagna recipe takes about 45 minutes to prepare, 30 minutes to bake, and 15 minutes to rest. So, it’s not a recipe for a quick weeknight meal! However, there are a few thing you can do to prep this recipe in advance.

  • Roast the eggplant in advance. One of the biggest time savers is roasting the noodles ahead of time. Roast and then refrigerate until the time of baking. They will accumulate moisture in the fridge, so pat them dry before assembling.
  • Make the tomato sauce in advance. It’s easy to let the tomato sauce simmer while you preheat the oven. But you can make it in advance too! Just refrigerate until serving: the flavor gets better over time.
  • Or, make the entire pan in advance! Leftovers store well; they can be refrigerated for up to 3 days and reheated in a 375°F oven.
Eggplant Lasagna Recipe

More eggplant recipes

This eggplant lasagna is one of our favorite new ways to use eggplant! Here are a few other eggplant recipes to try:

This eggplant lasagna recipe is…

Vegetarian and gluten-free.

Print
Eggplant Lasagna

Eggplant Lasagna


  • Author: Sonja Overhiser
  • Prep Time: 45 minutes
  • Rest time: 15 minutes
  • Cook Time: 30 minutes
  • Total Time: 1 hour 30 minutes
  • Yield: 9 pieces

Description

This eggplant lasagna recipe layers eggplant, homemade marinara, and a flavorful three-cheese filling! It’s a hearty dinner that pleases everyone.


Ingredients

  • 3 tablespoons olive oil
  • 3 large garlic cloves
  • 2 tablespoons unsalted butter
  • 1 15-ounce can crushed tomatoes, fire roasted if possible
  • 1 15-ounce can tomato sauce, fire roasted if possible
  • 1 teaspoon dried basil
  • 1 teaspoon dried tarragon (or oregano)
  • 2 teaspoons kosher salt, divided
  • 2 teaspoons cornstarch (or arrowroot starch)
  • 1 3/4 pounds eggplant (2 medium)
  • 2 ½ tablespoons chopped fresh thyme
  • Zest of 1/2 lemon
  • 16 ounces (2 cups) ricotta cheese
  • ¾ cup shredded Parmesan cheese, divided
  • 2 cups (7 ounces) shredded whole milk mozzarella cheese, divided
  • ¼ teaspoon ground nutmeg
  • Fresh ground black pepper

Instructions

  1. Preheat: Preheat the oven to 425°F.
  2. Roast the eggplant: Slice the eggplant into 1/2-inch slices (at least 12 planks; don’t worry if they vary in size). Place the slices on two parchment-lined baking sheets and brush each side with them with olive oil. Sprinkle with 1 teaspoon kosher salt, divided across the 2 trays. Roast for 10 minutes, then flip and bake 10 to 15 minutes more, until tender and golden brown.
  3. Prepare the sauce: Mince the garlic. Add the butter to a medium saucepan over medium heat: once melted, add the garlic and sauté until fragrant, about 1 minute. Turn down the heat and carefully add the crushed tomatoes, tomato sauce, basil, tarragon, ½ teaspoon kosher salt, and several grinds of black pepper. Remove ¼ cup of the sauce and stir it with the cornstarch, then add it back to the pan (this helps to thicken the sauce). Simmer while making the remainder of the recipe, at least 15 minutes. When ready to use, remove the pan from the heat.
  4. Meanwhile, prepare the cheese filling: Destem the thyme, then roughly chop the leaves. Add 2 tablespoons thyme to a medium bowl and reserve about ½ tablespoon for topping the lasagna. To the bowl, add the lemon zest, ricotta cheese, ½ cup Parmesan cheese, 1 cup shredded mozzarella cheese, nutmeg, ½ teaspoon kosher salt, and several grinds of black pepper. Stir to combine.
  5. Turn down the oven: Turn down the heat to 375°F.
  6. Assemble the lasagna: In a 9” x 9” baking dish or 7 x 11 baking dish (or similar volume dish), spread a ½ cup tomato sauce on the bottom of the pan. Then top with 1 layer of the eggplant, half of the cheese mixture (in dollops) and about ½ cup of the tomato sauce, using a spatula to spread the sauce evenly over the cheese. Repeat again, topping with 1 layer of eggplant, the remaining cheese mixture, and ½ cup of the remaining tomato sauce. Finally, top with a final layer of eggplant, then another ½ cup tomato sauce. Sprinkle the entire top with the remaining 1 cup mozzarella cheese, ¼ cup Parmesan cheese, and ½ tablespoon fresh thyme.
  7. Bake the lasagna: Bake the lasagna for 30 minutes, uncovered. Let stand for at least 15 minutes before serving (this allows the lasagna to set; you can let it sit even longer if desired). Leftovers can be refrigerated for up to 3 days and reheated in a 375°F oven.
  • Category: Main dish
  • Method: Baked
  • Cuisine: Italian inspired
  • Diet: Vegetarian

Keywords: Eggplant lasagna, Eggplant lasagna recipe, recipe for eggplant lasagna

A Couple Cooks - Recipes worth repeating.

Basil Rice

Basil rice is tasty addition to any meal! Fresh basil and garlic bring an herbaceous aromatic flavor to this easy…

A Couple Cooks – Recipes worth repeating.

Basil rice is tasty addition to any meal! Fresh basil and garlic bring an herbaceous aromatic flavor to this easy side dish.

Basil Rice

Need an easy side dish? Try this herbaceous basil rice! It’s simple to whip up with fresh basil, butter, and garlic, which bring an aromatic flavor to this easy side dish. A bit of lemon zest and juice add an extra citrus spin! It’s amazing what a few extra ingredients can do to add pizzazz to simple rice. This one is a standard on our table (and, you can make variations with any herbs you have on hand!).

Ingredients in basil rice

It’s simple to make basil rice, and it’s perfect for when you have fresh basil on hand. Whether it’s fresh from your garden or leftover from the store, it works perfectly to make an impressive and easy side dish. Here’s what you’ll need:

  • White long grain rice
  • Salted butter
  • Garlic (or garlic powder)
  • Fresh basil
  • Lemon, zest and juice, optional
Basil rice

Tips for basil rice

There’s no trick to basil rice: the fresh basil and bright lemon carry the flavors! Here are a few tips to keep in mind when you make a pot of rice:

  • No shortcuts with a short ingredient list! Use a real garlic clove for the best flavor (not jarred in either case). But if you don’t have garlic on hand, garlic powder tastes good too. If you have it, a real lemon gives a big punch to this recipe! But it’s optional and tastes great either way.
  • Rinse the rice. Rinsing rice removes starch from the outside of the grains. This prevents getting a gooey, sticky, gummy pot of rice.
  • Allow the pot to stand for 10 minutes after cooking. This rest time is crucial because it steams the rice, letting the water become fully absorbed into each grain.

Leftover storage

This basil rice recipe tastes the best the day of serving. But leftovers also keep well! Store leftover basil rice refrigerated for up to 5 days; reheat gently on the stovetop with a small splash of water. You may need to add an additional pinch or two of salt.

One thing to keep in mind for leftovers: the color of the basil darkens after refrigeration. So if you’re making this ahead, keep the basil separate and add right before serving.

Basil

Ways to serve basil rice

Basil rice is very versatile: it pairs with many Mediterranean-style recipes from chicken to fish and vegetarian dinners. Here are a few great ways to serve it:

More basil recipes

There are so many ways to cook basil into meals! Here are a few favorite basil recipes:

This basil rice recipe is…

Vegetarian and gluten-free. For vegan, plant-based, and dairy free, use olive oil.

Print
Basil Rice

Basil Rice


  • Author: Sonja Overhiser
  • Prep Time: 5 minutes
  • Rest Time: 10 Minutes
  • Cook Time: 12 minutes
  • Total Time: 27 minutes
  • Yield: 4

Description

Basil rice is tasty addition to any meal! Fresh basil and garlic bring an herbaceous aromatic flavor to this easy side dish.


Ingredients

  • 1 cup dry white long grain rice
  • ½ teaspoon kosher salt, divided
  • 1 tablespoon salted butter or olive oil
  • 1 small garlic clove, finely minced (or ¼ teaspoon garlic powder)
  • ½ cup thinly sliced basil
  • Zest from 1 lemon and/or 1 tablespoon lemon juice, optional

Instructions

  1. Place the rice in a fine mesh strainer and rinse it under cold water, then drain and shake dry.
  2. Place the rice in a saucepan with 1 ½ cups water and ¼ teaspoon of the kosher salt. Bring to a boil, then turn the heat to low. Cover and simmer 12 to 15 minutes, until the water is completely absorbed. Remove from the heat, cover and allow it to rest for 10 minutes.
  3. Fluff the rice with a fork. Stir in the butter, minced garlic, basil, lemon zest and juice (if using), and ¼ teaspoon kosher salt. Taste and add additional salt if necessary. Serve immediately or store leftovers refrigerated for up to 5 days; reheat gently on the stovetop with a tablespoon of water. Keep in mind, the color of the basil darkens after refrigeration, so if making in advance, add the basil directly before serving.
  • Category: Side dish
  • Method: Stovetop
  • Cuisine: American
  • Diet: Vegetarian

Keywords: Basil rice

A Couple Cooks - Recipes worth repeating.

Cornmeal Pancakes

These cornmeal pancakes are ultra fluffy and golden! Fry up a stack and drizzle with maple syrup for a satisfying…

A Couple Cooks – Recipes worth repeating.

These cornmeal pancakes are ultra fluffy and golden! Fry up a stack and drizzle with maple syrup for a satisfying breakfast.

Cornmeal Pancakes

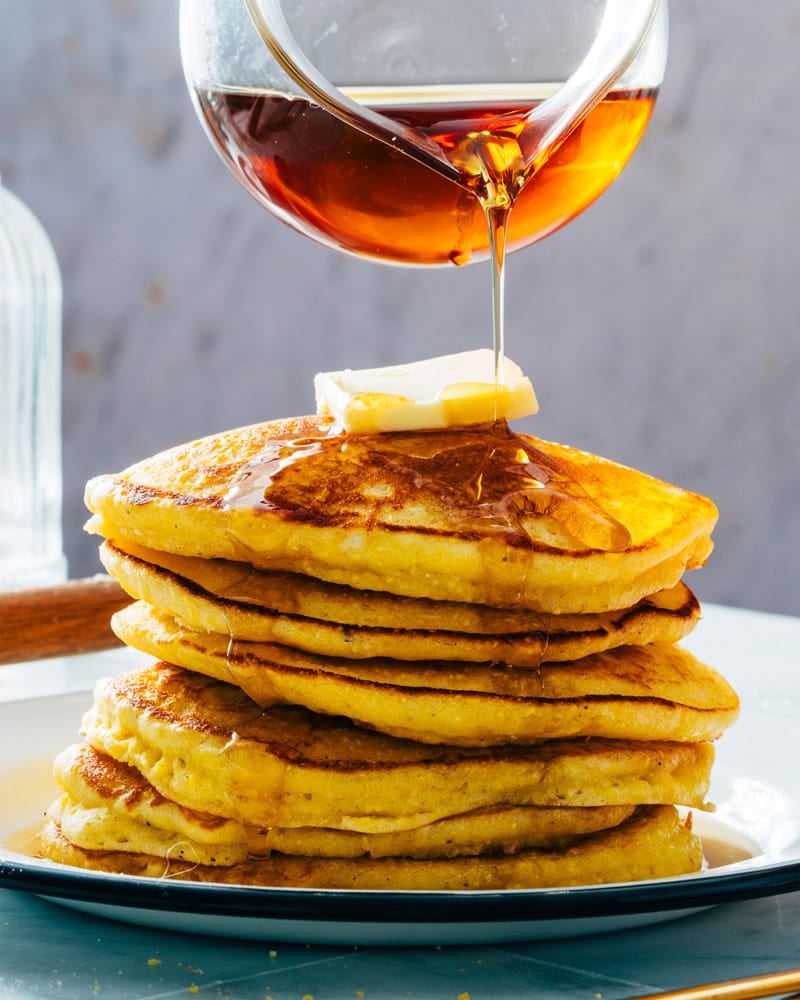
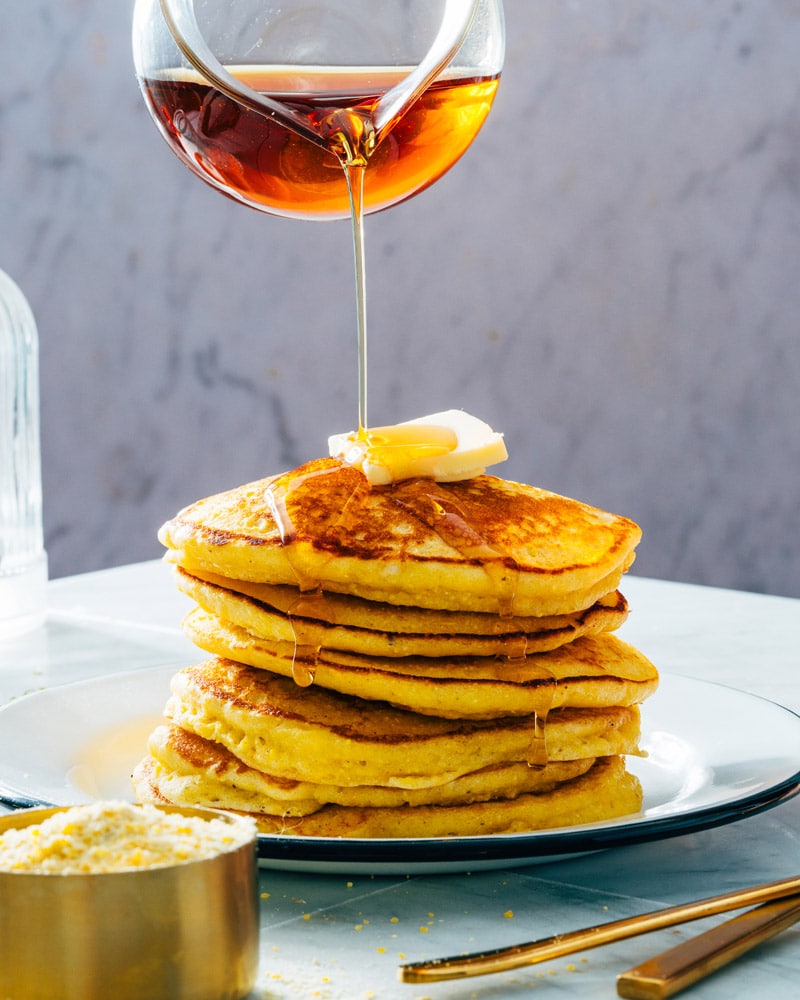
There are so many types of pancakes, from buttermilk to blueberry to cottage cheese. Here’s one that rises to the top of our list: Cornmeal Pancakes! These tasty flapjacks are crisp and golden on the outside, with a fluffy interior that tastes just like cornbread. Top them with a drizzle of maple syrup and a pat of butter and they’re perfect for a morning breakfast or special brunch! Our son Larson especially gobbled these down (though he has yet to meet a pancake he doesn’t like!).

Ingredients in cornmeal pancakes

Cornmeal pancakes are a fun cozy breakfast, and come out beautifully fluffy and golden. The magic ingredient? Buttermilk, which makes that airy texture and adds a hint of tang to the flavor. You’ll want to use the real stuff here (no substitutes!). Otherwise, you might have all the other items on hand in your pantry and fridge. Here are the ingredients for cornmeal pancakes:

  • Fine ground cornmeal
  • All-purpose flour
  • Baking powder
  • Granulated sugar
  • Kosher salt
  • Egg
  • Salted butter
  • Buttermilk
Cornmeal

Use real buttermilk for the best results

Buttermilk is absolutely crucial to making a light and fluffy muffin with a beautiful crumb. Many people, ourselves included, are often tempted to use even a buttermilk substitute: the most popular is milk and lemon juice (or another acidic ingredient like apple cider vinegar).

But for the best flavor and rise, it’s got to be the real thing! The substitute can work in a pinch, but there’s something about the flavor and texture that’s luxuriously rich when you use actual buttermilk.

Cornmeal Pancakes

Tips for cooking cornmeal pancakes

Cornmeal pancakes come together in the same way as any other pancake. Mix the wet ingredients with the dry ingredients, then cook on a skillet until golden brown! However, there are a few nuances to the process that are helpful:

  • Use a large griddle: a non-stick surface is helpful. Some griddles have uneven heating, so use a quality griddle or skillet. A non-stick surface is a plus, though you’ll still want to cook the pancakes in butter to get them golden brown.
  • Experiment to find the right heat level. Medium low heat is ideal, but it’s different on every stovetop. It should take a few minutes to get the pan up to heat. If the heat is too low, the pancakes won’t puff as much when cooking.
  • Don’t worry if the first pancake isn’t perfect! Use it as a test for honing in your pancake skills and adjust the heat accordingly.
  • The batter sometimes becomes very thick while waiting for the second batch. If so, add a teaspoon or two of buttermilk until the batter is pourable. 

Mix-ins, toppings, and variations

Want to mix up these cornmeal pancakes? It’s fun to add mix-ins to add a burst of flavor. You can also add fun toppings to step them up. Here are a few ideas:

  • Blueberries: Pour the batter into circles on the griddle, then place a handful of blueberries into the top of each pancake (this works better than mixing them into the batter). 
  • Strawberries or raspberries: Add a handful of sliced strawberries or raspberries to each pancake while it cooks.
  • Pecans: Add a hint of nutty flavor with a handful of finely chopped pecans in each pancake.
  • Fruit syrup or compote: Top the pancakes with blueberry syrup or strawberry compote for a fruity contrast.
  • Nut butter: Try them slathered with almond butter for hearty breakfast.
Cornmeal Pancakes

Cornmeal pancake leftovers and storage info

Cornmeal pancakes are easy to store: they’re actually great as leftovers. Store them refrigerated for tasty snacks with nut butter and a little maple syrup. Cornmeal pancakes store in a sealed container for up to 5 days refrigerated and 3 months frozen. It’s a nice way to extend the life of a batch.

What to do with leftover buttermilk

Most buttermilk recipes don’t use the entire container. What to do with the remainder if you buy it for these cornmeal pancakes?

More recipes with cornmeal

Got cornmeal? Here are a few more ways to use it:

This cornmeal pancakes recipe is…

Vegetarian. For gluten-free, use 1-for-1 gluten-free flour. For vegan, use a flax egg in place of the egg.

Print
Cornmeal Pancakes

Cornmeal Pancakes


  • Author: Sonja Overhiser
  • Prep Time: 15 minutes
  • Cook Time: 10 minutes
  • Total Time: 25 minutes
  • Yield: 8

Description

These cornmeal pancakes are ultra fluffy and golden! Fry up a stack and drizzle with maple syrup for a satisfying breakfast.


Ingredients

  • ¾ cup fine ground cornmeal
  • ¾ cup all-purpose flour
  • 2 teaspoons baking powder
  • 3 tablespoons granulated sugar
  • ½ teaspoon kosher salt
  • 1 large egg
  • 4 tablespoons melted salted butter, cooled
  • 1 ½ cups buttermilk

Instructions

  1. In a medium bowl, stir together the cornmeal, flour, baking powder, sugar, and kosher salt. In another bowl, whisk together the egg, melted butter, and buttermilk.
  2. Pour the dry ingredients into the wet ingredients, then stir gently to combine until the batter comes together and is pourable but slightly lumpy.
  3. Lightly butter a skillet or griddle and wipe off extra grease with a paper towel. Heat the skillet to medium low heat. Pour the batter into circles (about ¼ cup). Cook the pancakes until the bubbles pop on the top and the bottoms are golden. Then flip them and cook until cooked through. If the batter becomes very thick on the second batch, add a teaspoon or two of buttermilk until the batter is pourable. 
  4. Place the cooked pancakes under an inverted bowl to keep them warm. Repeat with the remaining batter, adjusting the heat as necessary to maintain an even temperature. Serve immediately with butter and maple syrup.
  • Category: Breakfast
  • Method: Stovetop
  • Cuisine: American
  • Diet: Vegetarian

Keywords: Cornmeal pancakes

A Couple Cooks - Recipes worth repeating.

Grilled Chicken

Here’s how to make grilled chicken breast! These tricks make it come out juicy and perfectly seasoned in minutes. You…

A Couple Cooks – Recipes worth repeating.

Here’s how to make grilled chicken breast! These tricks make it come out juicy and perfectly seasoned in minutes.

Grilled Chicken

You know it’s easy to make grilled chicken breast that tastes dry and bland? Have we got the recipe for you. Here’s how to make grilled chicken so it comes out juicy and perfectly seasoned every time! We’ve figured out the trick to an ultra-moist piece of chicken that melts in your mouth: and it takes just 2 minutes to do. Use this method and you’ll never have bland, boring chicken again!

Ingredients for grilled chicken

All you need are a handful of ingredients for grilled chicken. It’s possible to get major flavor with just a few common spices! Make sure to use smoked paprika (aka pimentón) if at all possible. It’s a type of paprika from Spain made of dried pimiento peppers that are smoked over a fire, then ground, which infuses it with smoky flavor. Here’s what you’ll need:

  • Boneless skinless chicken breasts, organic if possible
  • Olive oil
  • Garlic powder
  • Onion powder
  • Smoked paprika (pimentón)
  • Salt and pepper
Grilled Chicken

The trick: butterfly the chicken breast

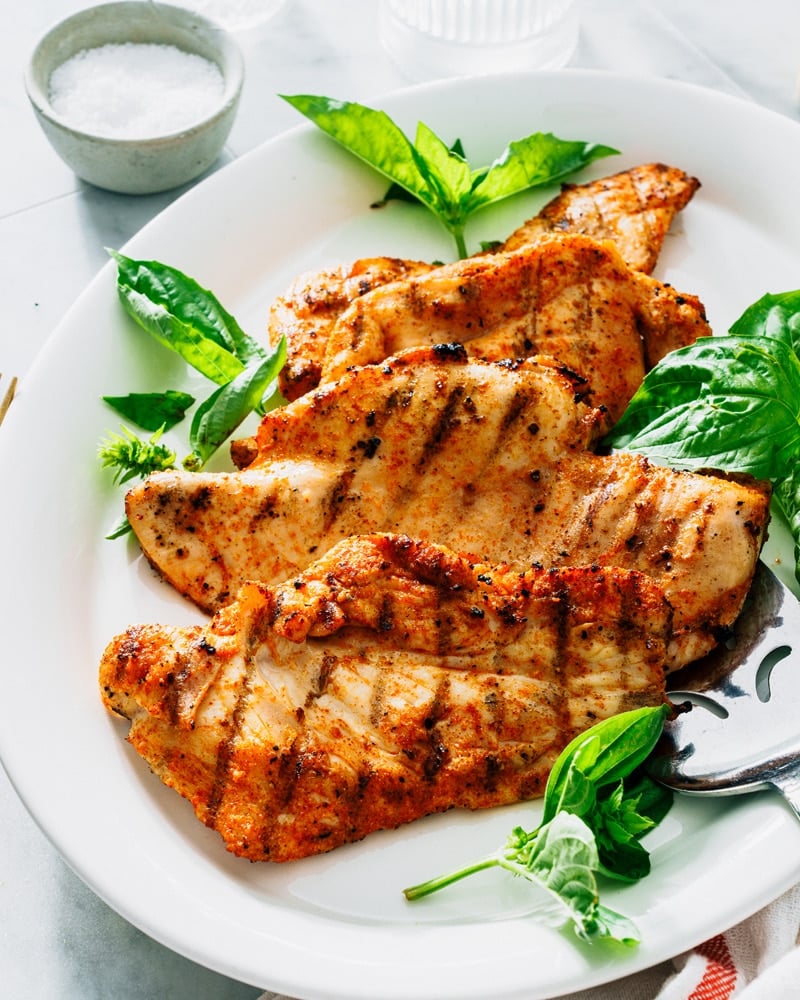
Chicken breasts are often very thick, making them easy to end up dry and tricky to cook evenly. The trick to juicy grilled chicken? Butterfly the chicken breast. Slicing the chicken breast in half horizontally makes thinner pieces that cook more evenly. Side bonus: they’re also easier to eat and better seasoned.

You can buy a chicken breast already butterflied, which may be marked on the package (or it may be labeled as “cutlets”). If you buy regular chicken breasts, you can easily butterfly it yourself in just 2 minutes! Here’s how to butterfly a chicken breast:

  • Place your hand over the top of the chicken breast.
  • Use a sharp knife to carefully slice the breast horizontally, leaving the edge intact so it can open up like a book (or butterfly!).
  • Unfold the chicken breast like a book, then for cutlets, cut along the fold to separate the two halves (each half is a cutlet).

How to grill chicken

Grilled chicken breasts are easy and cook very fast when they are butterflied. Here’s how to grill chicken:

  • Pat the chicken dry with a paper towel, then slice each breast in half horizontally (if not already butterflied). In a container, add olive oil, garlic powder, onion powder, smoked paprika, kosher salt, and a few grinds of black pepper and mix.
  • Cover and marinate in the refrigerator for 30 minutes (or up to 24 hours). 
  • Preheat a grill to high heat (450 to 550°F).
  • Grill the chicken breasts until grill marks appear and it releases from the grates, 2 to 4 minutes. Flip and cook until no longer pink in the center and the internal temperature is 165°F, 2 to 4 minutes.
  • Remove to a platter and cover with foil. Allow to rest for 5 minutes for maximum juiciness.
Chicken Pesto Sandwich

Buy organic chicken if possible

When shopping for this grilled chicken recipe, keep in mind: the best chicken to buy is organic. Buying organic makes sure that it is the highest quality meat that was raised sustainably. It is also free of chemicals and additives so it’s the healthiest option for eating, and overall: it just tastes better!

Per the USDA, organic chicken must be raised in living conditions that accommodate their natural behaviors (like grazing on pasture), fed 100% organic feed and forage, and not given antibiotics or hormones.

Grilled Chicken Breast

How to serve grilled chicken

Grilled chicken is easy to make into a meal. Add a grain and a vegetable and you’ve got dinner! Or, you can slice it into strips for a salad or throw it onto bread for a grilled chicken sandwich. Here are a few easy side dishes and ways to serve grilled chicken:

More chicken recipes

Love cooking with chicken? Here are a few more tasty chicken recipes to make:

This grilled chicken recipe is…

Gluten-free.

Print
Grilled Chicken

Grilled Chicken (Juicy & Easy!)


  • Author: Sonja Overhiser
  • Prep Time: 5 minutes
  • Rest Time: 30 minutes
  • Cook Time: 5 minutes
  • Total Time: 40 minutes
  • Yield: 4

Description

Here’s how to make grilled chicken breast! These tricks make it come out juicy and perfectly seasoned in minutes.


Ingredients

  • 2 boneless skinless chicken breasts (about 1 pound, organic if possible), butterflied or cutlets
  • ½ tablespoon olive oil
  • ½ teaspoon garlic powder
  • ½ teaspoon onion powder
  • ½ teaspoon smoked paprika
  • 1 teaspoon kosher salt
  • Freshly ground black pepper

Instructions

  1. Pat the chicken dry with a paper towel. If not already butterflied, place your hand over the top of each chicken breast. Use a sharp knife to carefully slice the breast horizontally, leaving the edge intact so it can open up like a book (or butterfly!). Unfold the breast like a book, then cut along the fold to separate the two halves.
  2. Add the chicken to a container and add the olive oil, garlic powder, onion powder, smoked paprika, kosher salt, and a few grinds of black pepper. Mix with your hands until evenly coated.
  3. Cover and marinate in the refrigerator for 30 minutes (or up to 24 hours). 
  4. Preheat a grill to high heat (450 to 550°F).
  5. Grill the chicken breasts until grill marks appear and it releases from the grates, 2 to 4 minutes. Flip and cook until no longer pink in the center and the internal temperature is 165°F, 2 to 4 minutes. Remove to a platter and cover with foil. Allow to rest for 5 minutes for maximum juiciness.
  • Category: Main dish
  • Method: Grilled
  • Cuisine: American
  • Diet: Gluten Free

Keywords: Grilled Chicken, How to Grill Chicken, Grilled Chicken Breast

A Couple Cooks - Recipes worth repeating.

Zucchini Brownies

This zucchini brownies recipe comes out ultra moist with deep chocolaty flavor! Bookmark this one for a deliciously simple treat.…

A Couple Cooks – Recipes worth repeating.

This zucchini brownies recipe comes out ultra moist with deep chocolaty flavor! Bookmark this one for a deliciously simple treat.

Zucchini Brownies

What do you make when you’ve made all the zucchini bread and zucchini muffins? Zucchini brownies, of course! Stop what you’re doing and gather the ingredients for this recipe that will have your friends and family running for another piece. The brownies come out ultra moist and gooey, with a deep, rich chocolaty flavor. They’re simple to make and you won’t believe the amazing flavor and texture!

Ingredients in this zucchini brownies recipe

The secret to rich and moist brownies? Zucchini! Turns out, adding shredded zucchini to brownies makes for an incredibly moist, gooey texture (which is what we prefer in a good brownie). It also lets you get away with not using eggs, which makes this zucchini brownies recipe accidentally vegan! Here are the ingredients in this recipe:

  • Granulated sugar
  • Neutral oil
  • Zucchini
  • Vanilla extract
  • Cocoa powder
  • Dutch process cocoa powder
  • Cornstarch
  • All-purpose flour
  • Baking soda
  • Kosher salt
  • Chocolate chips
Zucchini Brownies recipe

The flavor key: Dutch process cocoa powder

This zucchini brownies recipe uses a combination of two types of cocoa powder to achieve the deep, dark chocolaty flavor. The key? Dutch process (dark) cocoa powder, a special type of cocoa powder is treated with an alkali to make it pH neutral. This gives it a darker color and milder flavor. It makes the flavor ultra chocolaty, with deep rich notes instead of the lighter fruity notes that you’ll get with regular cocoa powder.

Tips for zucchini brownies

Zucchini brownies are as straightforward as a standard brownies recipe! There are just a few things to note for success:

  • Use a metal pan for baking. This makes for the most consistent bake and a better rise than a glass pan.
  • Finely grate the zucchini. This allows this green vegetable to meld seamlessly into the texture of the brownies.
  • Do not drain the zucchini! This recipe is optimized for undrained zucchini, using the moisture in this vegetable (which is 94% water!).
Zucchini Brownies recipe

Some notes on cooling and cutting

It’s important for recipes like brownies, muffins and quick breads to cool completely. This sets the texture and allows them to hold together better. The flavor is also generally better at room temperature. These zucchini brownies don’t hold together if they are very warm, so make sure to let them cool completely.

For best results, cool for 1 hour in the pan, then remove the brownies from the pan with the foil and allow to cool on a baking rack for another 1 hour until cooled.

To get clean slices, but through the brownies once they are cooled and clean off the knife after each cut.

Brownie variations

If you love non-standard brownies, you’ll love these zucchini brownies! A few other variations you’ll love:

Zucchini Brownies

Leftover storage info

These zucchini brownies hold up well over time! Store them refrigerated for up to 1 week. You can also store at room temperature, but they are so gooey that refrigeration is best: plus, they’ll last longer.

More zucchini bread and muffins

There are so many ways to mix up zucchini bread! This chocolate zucchini bread is our absolute favorite, but a close second is lemon zucchini bread: it’s zingy and bright! It’s the exact opposite of this bread but nearly as satisfying. Here are a few more zucchini recipes:

This zucchini brownies recipe is…

Vegetarian, vegan, plant-based and dairy-free.

Print
Zucchini Brownies

Zucchini Brownies


  • Author: Sonja Overhiser
  • Prep Time: 20 minutes
  • Cook Time: 30 minutes
  • Total Time: 50 minutes
  • Yield: 16

Description

This zucchini brownies recipe comes out ultra moist with deep chocolaty flavor! Bookmark this one for a deliciously simple treat.


Ingredients

  • 1 ¼ cup granulated sugar
  • ⅓ cup neutral oil (grapeseed, organic canola or vegetable oil, or other neutral oil of choice)
  • 2 cups finely shredded zucchini (packed not drained)
  • 1 teaspoon vanilla extract
  • ½ cup cocoa powder (standard)
  • 2 tablespoon Dutch process (dark chocolate) cocoa powder
  • 1 tablespoon cornstarch
  • 1 ¼ cups all-purpose flour
  • ½ teaspoon baking soda
  • ¾ teaspoon kosher salt
  • 1 cup semisweet chocolate chips

Instructions

  1. Preheat the oven to 350°F. Line a 9 x 9″ pan with a piece of aluminum foil.
  2. Stir together the sugar and oil with a spatula. Then stir in the zucchini, vanilla, cocoa powder, Dutch process cocoa powder, cornstarch, flour, baking soda, and salt. Fold in ¾ of the chocolate chips. Allow the batter to stand for 5 minutes to allow it to thicken.
  3. Pour the batter into the pan and top with the remaining ¼ cup chocolate chips. Bake 30 to 35 minutes until a tester comes out with a few clinging crumbs. Cool for 1 hour in the pan, then remove the brownies from the pan with the foil and allow to cool on a baking rack for another 1 to 2 hours until cooled. Slice into 16 pieces and serve (wash the knife after each slice to make for clean cuts). Leftovers store up to 1 week refrigerated. 
  • Category: Dessert
  • Method: Baked
  • Cuisine: Baked
  • Diet: Vegan

Keywords: Zucchini brownies, zucchini brownies recipe

A Couple Cooks - Recipes worth repeating.

Greek Salmon Salad

Greek salmon salad is a healthy dinner that’s full of fresh Mediterranean flavor! This easy meal is simple and satisfying.…

A Couple Cooks – Recipes worth repeating.

Greek salmon salad is a healthy dinner that’s full of fresh Mediterranean flavor! This easy meal is simple and satisfying.

Greek Salmon Salad

Looking for fun dinner ideas? This Greek salmon salad is healthy and satisfying, full of bold Mediterranean flavors! The star of the show is salmon bites, bite-sized pieces that add a pop of protein to each bite. Layer them over juicy tomatoes, cool cucumber, and feta cheese, and it’s a crowd-pleasing dinner idea that’s ideal in summer or anytime. Honestly, we’d eat this every night of the week! It’s that satisfying.

Ingredients in Greek salmon salad

This Greek salmon salad recipe is built around salmon bites, 1-inch bits of salmon that are cut into pieces before cooking. It makes them the perfect addition to salads, and what better pair than a refreshing Greek salad? Take our classic Greek salad, add a little arugula and top with the salmon bits. It makes the ideal Mediterranean diet dinner! Here’s what you’ll need:

  • 1 recipe Salmon Bites
  • Ripe tomatoes
  • Red onion
  • English cucumber
  • Baby arugula
  • Capers
  • Kalamata olives
  • Feta cheese
  • Olive oil
  • Red wine vinegar
  • Dried oregano and salt
Greek Salmon Salad

Making salmon bites

The key to Greek salmon salad is making these salmon bites! They’re quick to make in the broiler and take just 15 minutes total. Broiling salmon is one of our favorite ways to cook it because you don’t even have to wait for the time it takes to preheat the oven! Open the salmon bites recipe in a separate tab to see those ingredients. Here’s what to do:

  1. Preheat: Preheat a broiler to high.
  2. Season: Cut the salmon into 1-inch pieces, then toss them with the seasonings. Place on a foil-lined baking sheet brushed with olive oil.
  3. Broil: Broil 4 to 5 minutes until just tender and pink at the center (the internal temperature should be between 125 to 130°F in the center). 
  4. Toss with Garlic Lemon Butter: Melt butter, then stir in minced garlic and lemon zest. Toss the bites with the butter and sprinkle them over each Greek salad.
Salmon Bites Recipe

Notes for making salmon Greek salad

This salmon Greek salad is very simple and comes together in 30 minutes or less! Here are a few things to keep in mind when preparing and serving this dish:

  • Use an English cucumber. English cucumbers are a long, thin variety with a sweeter flavor, imperceptible skin, and less pronounced seeds than a standard cucumber. We recommend using them in most cucumber recipes because you don’t need to peel or seed them! If you use a standard cucumber, make sure to peel and seed.
  • Use baby arugula. Baby arugula (sold in boxes or bags) has a much milder flavor than standard arugula, which is sold in a bunch. If you can’t find it, use a different leafy green like spinach or mixed greens.
  • The recipe is very forgiving, so add ingredients to taste. Want to use more tomatoes or cucumber? Feel free! Do you prefer lettuce over baby arugula? Use that instead!

Tips for buying salmon

It’s important in any salmon recipe to buy good-quality salmon. Low quality salmon can taste very fishy and have a mushy texture, or have a lot of that white stuff when it’s cooked (called albumin). Good quality salmon has a fresh flavor that’s not fishy and a tender, flaky texture. Here’s what to look for when buying salmon:

  • Opt for fresh salmon if possible. We’ve found buying salmon fresh from the fish counter usually has the best flavor. However, frozen can work too: try to find higher-quality frozen salmon and avoid those big economy-sized bags (we’ve found this type can taste very fishy).
  • Look for wild caught salmon. Fish that is wild caught in your country is usually a sustainable choice. (There are also quality options in well-regulated farms; see Seafood Watch Consumer Guide.)
  • Know your types of salmon. We tend to like Coho salmon for its mild flavor: it’s a good middle of the road option in terms of price. Of course, King salmon is incredible but it’s expensive and we wouldn’t recommend it for this recipe. Atlantic salmon is most often farmed and not available wild caught. Ask about its source at the fish counter.
Salmon Greek Salad

Make ahead notes

This Greek salmon salad is best eaten the day it is made; leftovers become rather soggy. If you want to make it in advance, here are a few tips:

  • Make the salmon bites in advance and refrigerate until serving. If desired, you can re-warm them in the broiler or on the stovetop.
  • Chop the cucumber and red onion in advance and store refrigerated; add the tomatoes, arugula and dressing directly before serving.

More salmon recipes

Greek salmon salad makes a hearty, Mediterranean diet dinner that everyone will love! Here are a few more salmon recipes that make easy dinner ideas:

This salmon salad recipe is…

Gluten-free and pescatarian.

Print
Greek Salmon Salad

Greek Salmon Salad


  • Author: Sonja Overhiser
  • Prep Time: 25 minutes
  • Cook Time: 5 minutes
  • Total Time: 30 minutes
  • Yield: 4

Description

Greek salmon salad is a healthy dinner that’s full of fresh Mediterranean flavor! This easy meal is simple and satisfying.


Ingredients

  • 1 recipe Salmon Bites
  • 3 large ripe tomatoes, chopped into rough chunks
  • 1/2 large red onion, thinly sliced
  • 1 large English cucumber, cut into 1/2-inch pieces (or peeled, de-seeded and chopped for a standard cucumber)
  • 2 cups baby arugula
  • 2 tablespoons capers, drained
  • 1 cup Kalamata olives
  • 2 to 4 ounces high quality feta cheese
  • 2 tablespoons olive oil
  • 1 tablespoon red wine vinegar
  • 1 teaspoon dried oregano
  • ¼ teaspoon kosher salt, plus more to taste

Instructions

  1. Prepare the Salmon Bites by completing Steps 1-3.
  2. Chop the tomatoes, red onion and cucumber as noted above. 
  3. In a large bowl, combine the tomatoes, red onion, and cucumbers with the baby arugula, capers, Kalamata olives, feta cheese crumbles (saving out a few for garnish), olive oil, red wine vinegar, dried oregano, and salt. Gently mix to combine. Taste and adjust seasonings as desired.
  4. Cook the Salmon Bites by completing Steps 4-5.
  5. To serve, divide the salad between 4 plates, then top with the salmon bites. Garnish with additional feta cheese and serve. (If making in advance, prepare the salmon bites and refrigerate. Chop the cucumber and red onion in advance and store refrigerated; add the tomatoes, arugula and dressing directly before serving.)
  • Category: Main Dish
  • Method: Broiled
  • Cuisine: Seafood
  • Diet: Gluten Free

Keywords: Greek salmon salad, salmon gree

A Couple Cooks - Recipes worth repeating.

Watermelon Basil Salad

Watermelon basil salad hits the spot in summer! The blend of melon, feta cheese and herbs is simple and refreshing.…

A Couple Cooks – Recipes worth repeating.

Watermelon basil salad hits the spot in summer! The blend of melon, feta cheese and herbs is simple and refreshing.

Watermelon basil salad

Here’s one of the best ways to use a summer melon: watermelon basil salad! The classic combination of sweet melon and salty cheese is made even more perfect with basil. It gives a fresh, herbaceous finish that makes each bite positively irresistible! This summer salad is ideal for entertaining and we love having it on the table at parties or for a carefree evening al fresco. Here’s how to make this tasty side dish!

Ingredients in watermelon basil salad

This spin on the classic watermelon feta salad adds fresh basil to infuse fresh, herby flavor. It might seem like a trendy Pinterest invention, but the combination of sweet melon and salty cheese is a classic dish that’s eaten in the Middle East and Mediterranean. The juicy fruit paired with the savory feta is extremely refreshing: perfect for summer when you have rip melon on hand. Here are the ingredients you’ll need:

  • Ripe seedless watermelon, chilled
  • Olive oil
  • Lemon juice
  • Feta cheese
  • Fresh basil
Watermelon basil salad

How to cut watermelon

Chopping watermelon can be intimidating at first: but there’s an easy way to cut this large melon into cubes! Here’s the best way to cut a watermelon:

  1. Use a large Chef’s knife to slice the watermelon in half through the middle (not lengthwise).
  2. Flip the half over onto the flat base, then cut it into slices.
  3. Switch to using a small paring knife (using a smaller knife gives you more control). Slice off the rind of each slice.
  4. Switch back to the Chef’s knife. Make a grid pattern to cut the watermelon into cubes.
How to Cut a Watermelon: Make a grid pattern

Tips for making watermelon basil salad

This watermelon basil salad is quick and simple to whip up: cut the watermelon into cubes, then toss with the feta cheese, lemon juice, olive oil, and chopped basil! But keep in mind: the salad is best made fresh. This isn’t the best salad for leftovers! Here are a few tips for making this salad:

  • Flex the basil quantity as desired. You can adjust the basil quantity based on what you have on hand. If you’ve got loads of basil, you can use up to ½ cup chopped basil to make the dish sing.
  • If making in advance, cut the watermelon and store it separately. Chopped watermelon releases a lot of liquid. The best way to make this salad in advance is to cut the watermelon into cubes and store it separately. Then make up the salad right before serving. Basil also becomes brown after you chop it, so chop the basil directly before serving.
  • Leftovers can work, but aren’t optimal. Watermelon releases so much juice that leftovers don’t look quite as appetizing. This recipe is best as fresh as possible!
Watermelon Basil Salad

Variations on watermelon salad

There are so many ways to make a great watermelon salad! Here are a few of our top variations:

This watermelon basil salad recipe is…

Vegetarian and gluten-free.

Print
Watermelon basil salad

Watermelon Basil Salad


  • Author: Sonja Overhiser
  • Prep Time: 15 minutes
  • Cook Time: 0 minutes
  • Total Time: 15 minutes
  • Yield: 6

Description

Watermelon basil salad hits the spot in summer! The blend of melon, feta cheese and herbs is simple and refreshing.


Ingredients

  • 8 cups cubed ripe seedless watermelon, chilled
  • 1 tablespoon olive oil
  • 2 tablespoons lemon juice 
  • 3 ounces crumbled feta cheese
  • 1/4 to 1/2 cup chopped fresh basil

Instructions

  1. Combine all ingredients in a bowl. Serve immediately. If making ahead, refrigerate the cubed watermelon separately: it releases a large amount of water after it is cut. Then assemble the salad right before serving. Leftovers store for up to 2 days.
  • Category: Salad
  • Method: No Cook
  • Cuisine: Salad
  • Diet: Vegetarian

Keywords: Watermelon basil salad

A Couple Cooks - Recipes worth repeating.

Coffee Cake Muffins

This coffee cake muffins recipe is moist and fluffy, with a crumbly streusel topping! They’re perfect for breakfast or afternoon…

A Couple Cooks – Recipes worth repeating.

This coffee cake muffins recipe is moist and fluffy, with a crumbly streusel topping! They’re perfect for breakfast or afternoon snack.

Coffee cake muffins

Love a good coffee cake, with a tender, moist crumb and a cinnamon crumbly topping? Then you must try this coffee cake muffins recipe! These muffins taste just like coffee cake, but they’re quicker and easier to make. Buttermilk makes a beautifully tender crumb, and they’re topped with a sweet cinnamon streusel that gives a crunch to each bite. You won’t want to put these down! They’re ideal for breakfast or a sweet afternoon pick-me-up.

Ingredients in this coffee cake muffins recipe

Coffee cake muffins are a fun sweet treat; honestly, they’re really more like cupcakes! But call them a muffin and they work for breakfast too. They’re ideal paired with a cup of coffee to cut the sweetness. The secret ingredient? Buttermilk is essential for a tall and fluffy muffin. Outside of that, you’ll need the typical cast of baking characters. The ingredients for coffee cake muffins are:

  • All-purpose flour
  • Granulated sugar and brown sugar
  • Baking powder, baking soda, and salt
  • Buttermilk
  • Butter
  • Neutral oil
  • Eggs
  • Vanilla
  • Cinnamon
Coffee cake muffins recipe

Tricks for baking coffee cake muffins

This coffee cake muffins recipe incorporates a few tricks from one of our favorite bakers: Sarah’s Kieffer and her new baking cookbook, 100 Morning Treats. Sarah is an author and trained baker, and we’re lucky enough to have her as a real life friend too (she lives in Minnesota where I’m from originally!). This recipe is not in Sarah’s book, but we took a few pointers from her muffins method. Here are a few tricks to why this recipe works:

  • Use real buttermilk. Buttermilk is crucial to making a light and fluffy crumb. Don’t be tempted to use even a buttermilk substitute here! Milk and lemon juice works in a pinch, but it doesn’t make the rich beautiful texture of real buttermilk.
  • Use both butter and oil. Butter and oil work uniquely in baked goods. Butter adds richness in flavor and oil adds moisture.
  • Use tulip muffin liners. It’s not required, but using tulip muffin liners helps the streusel topping to stay on top of the muffins and not melt down the sides.
Coffee cake muffins recipe

Keys to tall muffins

These coffee cake muffins are tall with lovely domed tops. They look like a bakery style muffin, which can be tricky to achieve in at-home baking! Here are a few keys to how to achieve tall muffins:

  • Fill every other cup in two 12-cup muffin tins. Here’s a key to even baking for muffins: fill every other in a tin! It helps This helps them to have beautiful domed tops and an even bake. It’s not required, but helpful for perfect muffins.
  • Fill the muffin cups up to the top. This recipe is optimized so you have plenty of batter; you’ll fill the muffin cups very full up to the top. This avoids stubby muffins!
  • Baking at 375°F makes a taller muffin. Many muffin recipes baked at 350°F, but a slightly hotter oven makes a taller and fluffier muffin. This recipe also has a hefty amount of leavener (baking powder and baking soda) for a good rise.

Storage info

These coffee cake muffins taste best the day they’re baked. But they hold up well over time, making them ideal for making ahead. You’ll want to keep them refrigerated because of the crunchy topping, which can become soggy stored at room temperature. Here’s what to know:

  • Refrigerator: Store refrigerated for up to 1 week! Let them stand at room temperature for a few minutes before eating.
  • Freeze: Freeze in a sealable container and store up to 3 months.
Coffee cake muffins

More muffin recipes

This coffee cake muffins recipe is a favorite sweet treat of ours: it’s perfect for special breakfasts or brunches! Here are a few more muffin recipes to try:

This coffee cake muffins recipe is…

Vegetarian.

Print
Coffee cake muffins

Coffee Cake Muffins


  • Author: Sonja Overhiser
  • Prep Time: 30 minutes
  • Cook Time: 20 minutes
  • Total Time: 50 minutes
  • Yield: 12

Description

This coffee cake muffins recipe is moist and fluffy, with a crumbly streusel topping! They’re perfect for breakfast or afternoon snack.


Ingredients

For the streusel

  • ¼ cup light brown sugar
  • ¼ cup granulated sugar
  • ½ cup all purpose flour
  • 1 teaspoon ground cinnamon
  • ⅛ teaspoon kosher salt
  • 4 tablespoons unsalted butter, softened

For the muffins

  • 2 cups [280 g] all purpose flour
  • 2 teaspoons baking powder
  • ¼ teaspoon baking soda
  • ¾ teaspoon kosher salt
  • 1 cup granulated sugar
  • ¾ cup buttermilk*
  • 5 tablespoons melted unsalted butter
  • ⅓ cup neutral oil
  • 2 eggs
  • 2 teaspoons vanilla extract

Instructions

  1. Preheat the oven to 375°F. Place muffin wrappers in every other muffin cup of two 12-cup muffin tins.**
  2. Make the streusel topping: In a medium bowl, combine the light brown sugar, granulated sugar, flour, cinnamon and salt. Use a fork to mash the softened butter into the mixture until completely combined and crumbly. Refrigerate until using.
  3. In a large bowl, whisk the flour, baking powder, baking soda, and kosher salt. Make a well in the center.
  4. In a medium bowl, whisk the granulated sugar, buttermilk, melted butter, neutral oil, eggs, and vanilla extract. Pour the wet ingredients into the well in the dry ingredients. Mix gently until just combined and there are no longer streaks of flour. (If desired, you can store the batter up to 24 hours before baking.)
  5. Scoop the batter into the muffin papers using a dough scoop: it should fill to the top of the muffin papers. Sprinkle the tops with the streusel.
  6. Bake until the tops are golden brown and a toothpick in the center comes out with a few crumbs, about 20 to 23 minutes total (rotate the pans halfway through baking). Allow to cool for 5 minutes, then transfer to a baking rack to fully cool (about 30 minutes to 1 hour). The muffins are best eaten the day they are made, but they store very well in an airtight container in the refrigerator and last up to 1 week or frozen for up to 3 months.

Notes

*Buttermilk is the magic ingredient which makes the most consistent texture and rise! Don’t be tempted to leave it out or use a buttermilk substitute. It’s worth it (we promise).

**Baking in every other tin makes for a more consistent bake. If all you have is a 12-cup muffin tin, you can use that too.

  • Category: Muffin
  • Method: Baked
  • Cuisine: American
  • Diet: Vegetarian

Keywords: Coffee cake muffins

A Couple Cooks - Recipes worth repeating.

Crispy Tofu

This crispy tofu recipe is the best, with crunchy sides and a tender interior! It’s easy to make on the…

A Couple Cooks – Recipes worth repeating.

This crispy tofu recipe is the best, with crunchy sides and a tender interior! It’s easy to make on the stovetop or baked.

Crispy Tofu

Over the years, we’ve become huge fans of tofu. And here’s a way to prepare it that we cannot get enough of: this crispy tofu recipe! It’s easy to make and comes out perfectly seasoned, with extra crunchy edges and a tender interior. There’s no need to even press the tofu! It’s actually pretty amazing that it can go from a tasteless blob to meaty, savory cubes in just 20 minutes.

Ingredients in this crispy tofu recipe

This crispy tofu recipe requires just 5 ingredients to make crunchy squares that are perfect for topping salads, bowl meals, and more. Tofu is soy milk that’s turned into curds and pressed into blocks. It was invented in China and is used in many Asian cuisines from Chinese to Thai. Right out of the package it’s tasteless and mushy, but cook it up properly and it tastes meaty and textured! Here’s what you need for this crispy tofu recipe:

  • Extra firm tofu: This is important! Do not make this recipe with anything other than packages labeled “extra firm tofu.” Firm tofu or silken tofu will not work here.
  • Cornstarch: Cornstarch makes for crispy edges! This ingredient is also required. If desired, you can substitute arrowroot starch.
  • Olive oil: Use olive oil for cooking the tofu in a skillet.
  • Toasted sesame oil: Toasted sesame oil is for seasoning the tofu after cooking it. Make sure it is marked “toasted” on the bottle; regular sesame oil does not have the signature sesame flavor.
  • Soy sauce or smoked soy sauce: Use smoked soy sauce (smoked shoyu) if you can find it: it adds a delightful smoky savory flavor. If desired, you can substitute tamari for gluten-free or coconut aminos.
Crispy tofu recipe

Required equipment: a non-stick skillet

This crispy tofu recipe is pan fried on the stovetop. You’ll need one special piece of equipment for this recipe: a non-stick skillet (or an alternative non-stick surface like ceramic)! This is important because the tofu will stick if you use an aluminum or cast iron skillet.

Don’t have a non-stick surface? Go to this Baked Tofu recipe instead: it’s just as tasty!

No tofu pressing required!

Here’s one of our favorite thins about this crispy tofu recipe: it without pressing it! If you’ve made tofu before, you’ll know that often recipes indicate to wrap the tofu in a towel and placing a heavy object on top for 30 minutes.

Instead, this crispy tofu recipe doesn’t require pressing at all! It’s perfect for weeknight dinners because you don’t have to waste the time waiting for it to press. Simply dry it off with a towel and you’re good to go.

Crispy tofu

How to make crispy tofu

This crispy tofu is pan fried in a skillet, which takes around 20 minutes and is quicker than the baked version. All you need is a non-stick skillet! Here’s what you’ll need to do:

  • Slice and toss with cornstarch: Slice the tofu into cubes. Dry it off with a towel, then toss it with cornstarch.
  • Cook side 1: Place the tofu in cold oil. Then bring it up to medium heat and cook 5 to 6 minutes until one side is golden brown.
  • Flip! Remove the pan from the heat to reduce spitting. Then flip the tofu with a spatula.
  • Cook side 2: Return to the heat. Cook another 5 to 6 minutes.
  • Season & cook a little more: Add toasted sesame oil and soy sauce. Cook another few minutes until the sauce is thickened.

Or, make crispy baked tofu!

If you prefer, you can make crispy baked tofu instead! Our method for baked tofu has loads of positive reviews and is easy to whip up. This is a great alternative if you don’t have a non-stick pan, or you want a method that’s less hands on.

To make crispy baked tofu, you’ll mix the tofu with cornstarch and seasonings, then bake it at 425°F for 30 to 35 minutes until crispy. Allow to cool for 5 minutes before serving.

Crispy tofu recipe

Ways to use crispy tofu

Crispy tofu makes a meal! This component works with just about anything: add a grain or veggie and it’s dinner. You can also use it as a vegan or vegetarian protein to add to salads, tacos, and more. Here are a few ways to use crispy tofu:

Storage and leftovers

This crispy tofu recipe saves very well! Though the tofu tastes best the day of making, it actually holds up well in the refrigerator for 3 to 4 days. It’s great for making ahead for lunches and dinners throughout the week.

More tofu recipes

Our tofu recipes are some of our favorites on this website! The baked tofu and pan fried tofu are standbys, and we’re glad to have this crispy tofu as part of our repertoire. Here are a few more favorite ways to make tofu:

This crispy tofu recipe is…

Vegetarian, vegan, plant-based, dairy-free and gluten-free.

Print
Crispy Tofu

Crispy Tofu (in 20 Minutes!)


  • Author: Sonja Overhiser
  • Prep Time: 5 minutes
  • Cook Time: 15 minutes
  • Total Time: 20 minutes
  • Yield: 4

Description

This crispy tofu recipe is the best, with crunchy sides and a tender interior! It’s easy to make on the stovetop or baked. For the baked variation, go to Baked Tofu.


Ingredients

  • 14-ounces firm or extra firm tofu
  • Kosher salt
  • 3 tablespoons cornstarch (or arrowroot starch)
  • 2 tablespoons olive oil
  • 1 tablespoon toasted sesame oil
  • 2 tablespoons smoked soy sauce or soy sauce (or tamari for gluten-free)

Instructions

  1. Cut the tofu into 1-inch cubes and pat it dry with a clean towel. Add the tofu cubes to a bowl and sprinkle with 2 pinches kosher salt. Sprinkle with the cornstarch, turning the cubes with a spatula, until evenly coated.
  2. Add the olive oil to a large, cold non-stick skillet* (this is important; it only works with non-stick surface!). Add the tofu cubes in a single layer.
  3. Turn on the heat to medium-high. Cook 5 to 6 minutes until lightly browned on the bottom.
  4. Briefly remove the pan from the heat to reduce spitting. Flip the tofu with a spatula. Return the heat to medium-high and cook additional 5 to 6 minutes until browned.
  5. Briefly remove from the heat again and drizzle with the sesame oil and soy sauce (watch for spitting). Return to low heat and cook, turning often, until darkened and sauce has thickened, about 2 minutes. Taste and if desired, add a few pinches salt. Serve immediately or refrigerate for up to 3 to 4 days. Perfect for adding to salads, bowl meals, and more. 

Notes

*If you don’t have a non-stick skillet, make this Baked Tofu recipe instead.

  • Category: Main dish
  • Method: Stovetop
  • Cuisine: Vegan
  • Diet: Vegan

Keywords: Crispy tofu, crispy tofu recipe

A Couple Cooks - Recipes worth repeating.

Bow Tie Pasta Salad

This bow tie pasta salad recipe is simple and so tasty! Pair noodles with tomatoes, herbs, and feta cheese for…

A Couple Cooks – Recipes worth repeating.

This bow tie pasta salad recipe is simple and so tasty! Pair noodles with tomatoes, herbs, and feta cheese for a satisfying side dish.

Bow tie pasta salad

If there’s something we never tire of, it’s a good pasta salad. They’re fun, delicious, and give us those carefree summer vibes. But sometimes they can take a while to make, especially if they have lots of ingredients. So this easy bow tie pasta salad has become a favorite! Pair the chewy noodles with tomatoes, fresh herbs, and feta cheese, then swirl it with a quick and easy vinaigrette dressing. It’s a quick side dish that everyone will love!

Bow tie pasta salad ingredients

Pasta salad is always a fun side dish, but it can also feel like it takes a while and can make a big mess when the recipe has lots of ingredients like our classic pasta salad. So, we’ve taken to making simpler recipes like this bow tie pasta salad! You only need a handful of vegetables and a homemade Italian dressing to make the ingredients sing. Here’s what you’ll need:

  • Bowtie pasta
  • Cherry tomatoes
  • Shallot
  • Garlic
  • Fresh parsley and basil
  • Lemon juice and zest
  • Red wine vinegar
  • Dried oregano, dried dill and salt
  • Olive oil
  • Feta cheese
Bow Tie Pasta Salad recipe

Cooking the pasta

The key to any good pasta salad recipe is boiling the pasta to “al dente”, which means “to the bite” in Italian. This is when the pasta is tender with a small white speck inside when you bite into a piece. It’s also important to liberally salt the pasta water to properly season the pasta. Here are a few tips:

  • Add about 1 tablespoon kosher salt to a pot of water. This seems like a lot, but you’ll want the water to taste salty so it seasons the noodles.
  • Boil the pasta a few minutes less than indicated on the package instructions. Often package instructions make for overcooked pasta, so always set your timer for before that time.
  • Start taste testing early. Start taste testing and stop cooking when the pasta is just tender but you can still see a small white speck inside.

Use any type of short cut pasta

Bow tie pasta is also known as farfalle, a short pasta shape formed like a butterfly (farfalle is the Italian word for butterfly). Farfalle is more often served vegetables, in creamy or tomato sauces, pasta salads, or even in soups. While this bow tie pasta salad is optimized for a specific shape, but it can work with other types as well. Pasta salads are made with short cut pasta, and there are lots of shapes that would work here. Try the following short cut pasta shapes:

  • Spirals (fusilli)
  • Penne
  • Shells (conchiglie)
  • Orecchiette
  • Gemelli
  • Gigli
Bow Tie Pasta Salad

Storage and leftovers

This bow tie pasta salad stores for up to 5 days refrigerated. Leftovers taste great: it’s best to allow them to come to room temperature and add a swirl more olive oil or a bit more cheese or salt as necessary.

More pasta salad recipes

Pasta salad makes a perfect summer side dish with a dinner on the grill, or a tasty lunch idea. There are so many different ways ways to make them! Here are a few ideas for changing it up:

This bow tie pasta salad recipe is…

Vegetarian. For vegan, use dairy-free feta cheese. For gluten-free, use gluten-free pasta.

Print
Bow tie pasta salad

Bow Tie Pasta Salad


  • Author: Sonja Overhiser
  • Prep Time: 15 minutes
  • Cook Time: 10 minutes
  • Total Time: 25 minutes
  • Yield: 5 to 6

Description

This bow tie pasta salad recipe is simple and so tasty! Pair noodles with tomatoes, herbs, and feta cheese for a satisfying side dish.


Ingredients

  • 8 ounces bowtie pasta (farfalle)
  • 1 pint cherry tomatoes, sliced in half (2 cups)
  • 1 large shallot, thinly sliced
  • 1 garlic clove, minced
  • 2 tablespoons chopped fresh parsley
  • ¼ cup chopped fresh basil (or 2 more tablespoons parsley)
  • 1 ½ tablespoons lemon juice, plus zest of ½ lemon
  • 1 tablespoon red wine vinegar
  • ½ teaspoon dried oregano
  • ½ teaspoon dried dill
  • ¾ teaspoon kosher salt
  • 2 tablespoons olive oil
  • ¾ cup (3 ounces) feta cheese crumbles
  • Fresh ground black pepper, to toaste

Instructions

  1. Start a large pot of well-salted water to boil. Boil the pasta until al dente according to the package instructions. Drain the pasta and run cool water over it until it’s room temperature.
  2. Meanwhile, prepare the tomatoes, shallot, garlic, parsley, and basil as noted in the ingredient list.
  3. In a large bowl, whisk together the lemon juice, lemon zest, red wine vinegar, oregano, dill, and kosher salt. Then whisk in the olive oil.
  4. Once the pasta is done, add it to the large bowl of dressing and toss with the chopped vegetables and herbs. Add the feta cheese and fresh ground black pepper and stir to combine.
  5. Taste and add more salt to taste if necessary. Serve immediately. Stores up to 5 days refrigerated (leftovers taste great; allow to come to room temperature and add a swirl more olive oil or a bit more cheese or salt as necessary).
  • Category: Side dish
  • Method: Stovetop
  • Cuisine: American
  • Diet: Vegetarian

Keywords: Bow tie pasta salad, bow tie pasta salad recipes

A Couple Cooks - Recipes worth repeating.