No-Bake Pumpkin Cheesecake Bars

No-bake pumpkin cheesecake bars.This no-bake pumpkin cheesecake bars recipe features a sweet, spiced Biscoff crust, a soft, pumpkin pie filling, and a Biscoff spread on top!
No-bake pumpkin cheesecake bars.

If you’re craving a smooth, creamy dessert that brings together fall’s best flavors without any baking, these No Bake Pumpkin Cheesecake Bars are your answer! Layers of spiced pumpkin and rich cream cheese sit on top of a buttery Biscoff cookie crust, making every bite absolutely irresistible.

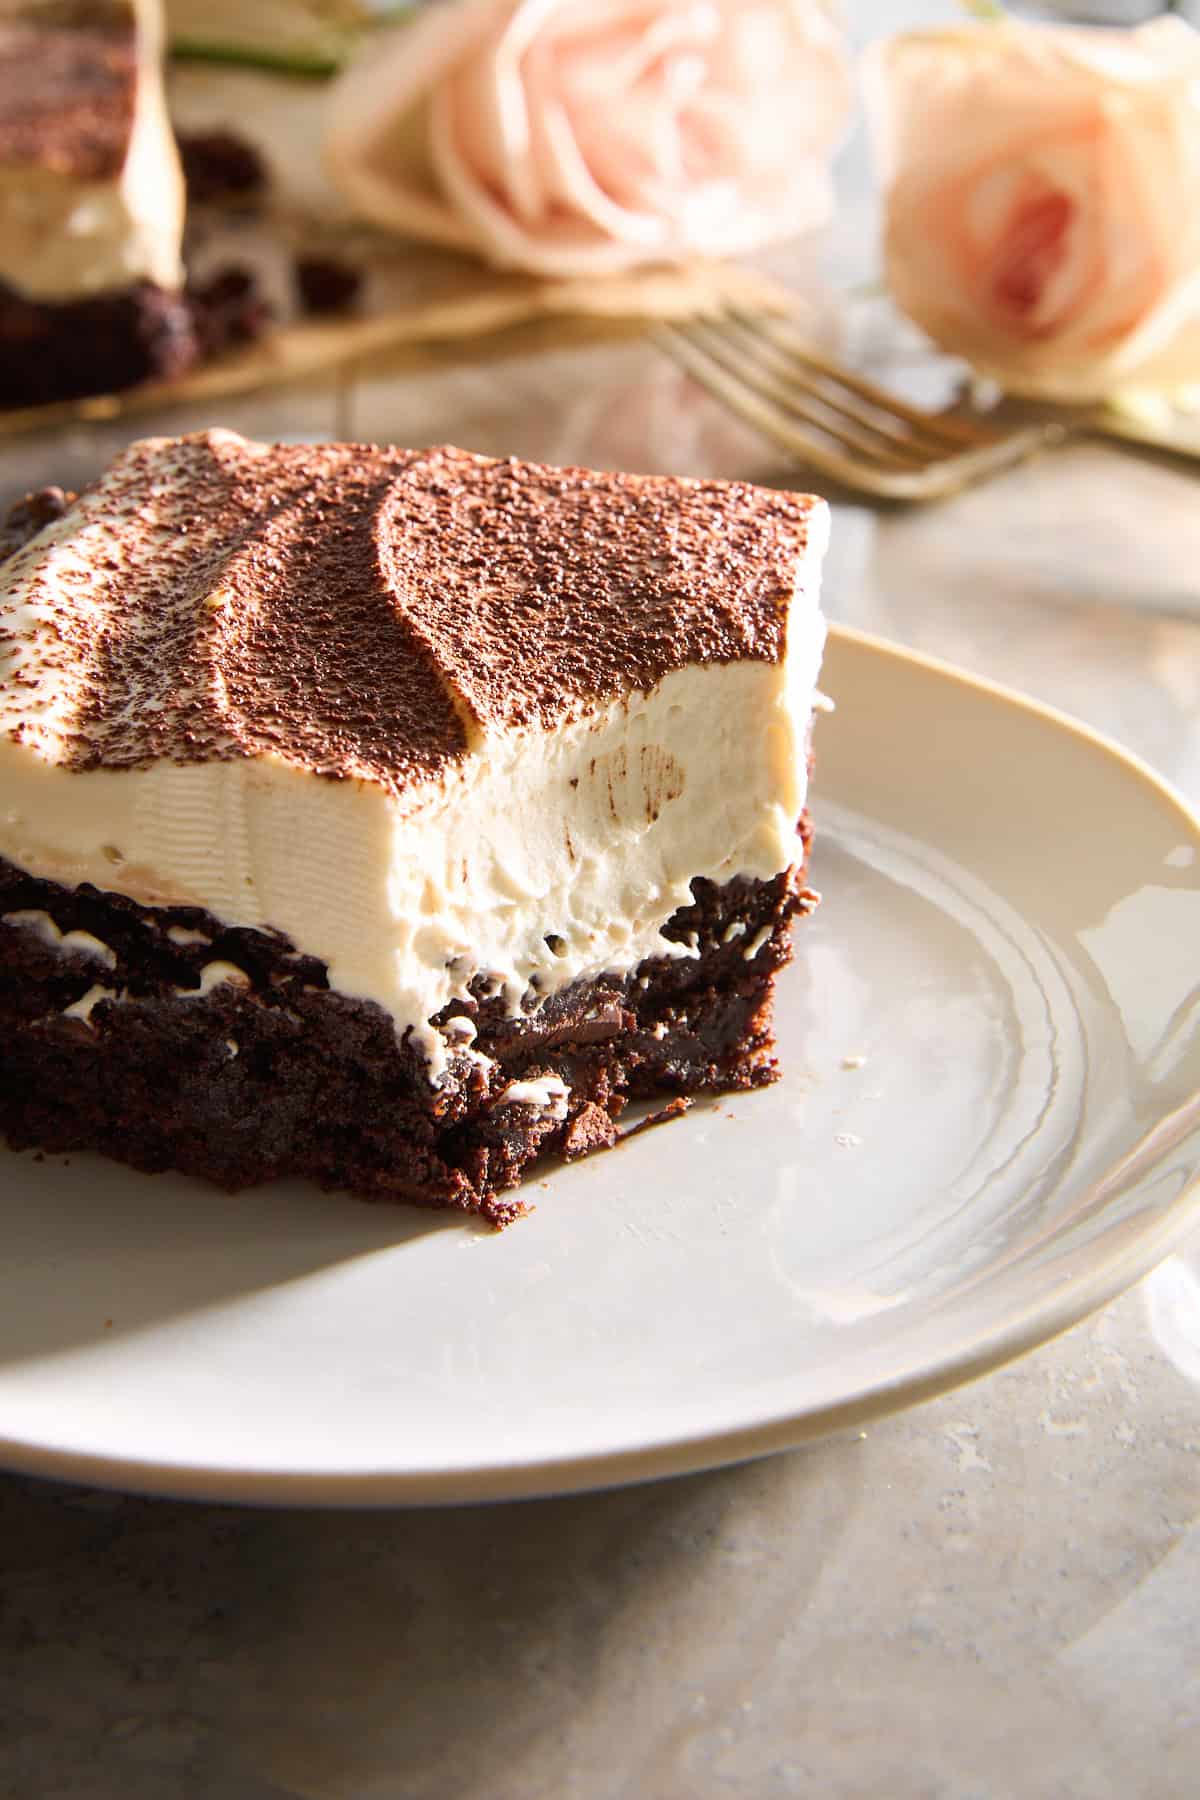
No-bake pumpkin cheesecake bars topped with whipped cream.

What are No Bake Pumpkin Cheesecake Bars?

No bake pumpkin cheesecake bars are a layered dessert with a spiced pumpkin and cream cheese filling over a cookie crumb crust. With a base made from Biscoff cookies and pecans, this dessert has a sweet, caramelized flavor that pairs perfectly with the creamy, pumpkin-filled topping. The result is a smooth, satisfying bite that combines the warmth of fall spices with a slight crunch from the crust, making these bars an instant seasonal favorite!

What makes this recipe especially appealing is the lack of oven time, making it perfect for when you’re short on time or just want to keep things easy. With a few simple steps, the cheesecake layers set beautifully in the fridge, creating a chilled dessert that’s rich, creamy, and comforting. These bars are great for a cozy night in or as a make-ahead dessert for holiday get-togethers!

Ingredients You Need

Crust:

  • Biscoff Cookie Crumbs – These give the crust a caramelized, slightly spiced base that’s perfect for fall flavors. Use a food processor to get the crumbs nice and fine.
  • Whole Pecans – We add these to the crust for a touch of nutty richness that complements the Biscoff flavor beautifully. Pulse them with the cookies until well blended.
  • Light Brown Sugar – This adds a bit of sweetness and helps the crust bind together. We love how it deepens the caramel notes.
  • Cinnamon – Just a little bit of this spice enhances the warmth of the crust. Cinnamon is a perfect match for pumpkin.
  • Sea Salt – A small amount of salt balances out the sweetness and makes the other flavors pop.
  • Unsalted Butter – Melted butter is essential for a moist crust that holds together when sliced.

Filling:

  • Cream Cheese – Room temperature cream cheese is the base of the smooth, creamy filling. 
  • Heavy Whipping Cream – This adds fluffiness to the filling and helps create a light, airy texture. Make sure it’s cold when you whip it.
  • Powdered Sugar – Provides sweetness and a silky smooth consistency without graininess. 
  • Pure Vanilla Extract – Just a hint adds warmth and depth and balances the spices and sweetness in the filling.
  • Sea Salt – Salt enhances the flavors of the other ingredients and keeps the filling from being too sweet.
  • Pumpkin Puree – Real pumpkin puree brings an earthy, slightly sweet element. Make sure it’s plain, not pie-filling!
  • Cinnamon – Brings warmth and coziness to the filling and complements the pumpkin.
  • Nutmeg – Nutmeg adds a subtle spice with a hint of sweetness.
  • Cloves – A little goes a long way here, adding depth and more fall flavor.
  • Ginger – Brings a touch of warmth and spice, balancing the sweetness of the filling.
  • Allspice – Adds a hint of spiciness that rounds out the pumpkin flavor.

Topping:

  • Melted Biscoff Spread – Melting Biscoff spread makes it easily spreadable, creating a gorgeous topping with a sweet, spiced flavor that complements the pumpkin and cream cheese filling.
No-bake pumpkin cheesecake bars sliced into nine pieces.

How to Make No Bake Pumpkin Cheesecake Bars

  1. Prepare the Crust. Add the Biscoff cookie crumbs, pecans, brown sugar, cinnamon, and sea salt to a food processor. Pulse until the mixture is fine and well-blended. Pour in the melted butter and pulse again until the crumbs become moist.
  2. Press and Chill. Firmly press the crust mixture into a prepared pan. Place in the fridge to chill and firm up.
  3. Make the Cheesecake Filling. Place the cream cheese in a large bowl and beat with a mixer. Once it’s smooth and fluffy, pour in the powdered sugar, salt, and vanilla extract and mix again. Then, add pumpkin puree, heavy cream, cinnamon, nutmeg, cloves, ginger, and allspice and mix a final time.
  4. Assemble the Layers. Spread the pumpkin cream cheese mixture evenly over the chilled crust. Smooth it with a spatula to create a flat, even layer, and return it to the refrigerator.
  5. Add the Topping. Melt the Biscoff in the microwave before pouring it over top of the cheesecake. Use a spatula or toothpick to gently swirl the spread for a decorative look.
  6. Chill the Bars. Refrigerate for several hours or until fully set. Then, top with sea salt, cut them into bars, and serve cold.
No-bake pumpkin cheesecake bars topped with whipped cream and salt.

Variations

  • Graham Crackers – Swap the Biscoff cookies for graham cracker crumbs.
  • Chocolate Chips – Fold mini chocolate chips into the filling for a chocolatey twist.
  • Maple Syrup – Add a touch of maple syrup to the filling for an extra hint of fall flavor.
  • Whipped Cream – A dollop of whipped cream makes each bar feel a bit more indulgent.
  • Ginger Snaps – Use ginger snap crumbs in place of Biscoff cookies for a spicier, festive crust.
  • Nuts – Chopped pecans or walnuts add extra crunchy texture and nuttiness.

Can I Store Leftovers?

These bars stay fresh in the fridge for days and can even be frozen.

Refrigerate leftovers in an airtight container for up to 3 days.

Wrap the bars with plastic wrap and then aluminum foil and store them in the freezer for up to 3 months.

More Cheesecake Recipes

If you’re like us, and can’t get enough of cheesecake, you’ll want to check out more of our creamy, dreamy recipes!

No Bake Biscoff Upside Down Cheesecake

Cheesecake Fruit Tart with Shortbread Crust

Lemon Cheesecake Bars

Baklava Cheesecake

No-bake pumpkin cheesecake bars.
Print Recipe
No ratings yet

No-Bake Pumpkin Cheesecake Bars Recipe

This no-bake pumpkin cheesecake bars recipe features a sweet, spiced Biscoff crust, a soft, pumpkin pie filling, and a Biscoff spread on top!
Prep Time20 minutes
Chill Time5 hours
Total Time5 hours 20 minutes
Course: Dessert
Cuisine: American
Keyword: no-bake pumpkin cheesecake bars, pumpkin cheesecake bars, pumpkin cheesecake bars recipe
Servings: 9 bars
Author: Food Dolls

Equipment

Ingredients

For the Crust:

  • 2 1/3 cups Biscoff cookie crumbs
  • 1/4 cup whole pecans
  • 2 Tablespoons light brown sugar
  • 1/4 teaspoon cinnamon
  • 1/8 teaspoon sea salt
  • 8 Tablespoons unsalted butter melted

For the Filling:

  • 16 ounces cream cheese room temperature
  • 1 1/4 cups powdered sugar
  • 2 teaspoons pure vanilla extract
  • 1/8 teaspoon sea salt
  • 1 cup pumpkin puree
  • 1 cup heavy whipping cream cold
  • 1/2 teaspoon cinnamon
  • 1/4 teaspoon nutmeg
  • 1/8 teaspoon cloves
  • 1/4 teaspoon ginger
  • 1/8 teaspoon allspice

For the Topping:

  • 1/2 cup melted Biscoff spread

Instructions

Make the Crust:

  • In a food processor, combine Biscoff cookie crumbs, pecans, brown sugar, cinnamon, and sea salt. Pulse until finely ground. Add melted butter and mix until the crumbs are moistened. Press the mixture into a lined 9×9-inch pan and refrigerate for 30 minutes.
    2 1/3 cups Biscoff cookie crumbs, 1/4 cup whole pecans, 2 Tablespoons light brown sugar, 1/4 teaspoon cinnamon, 1/8 teaspoon sea salt, 8 Tablespoons unsalted butter

Prepare the Filling:

  • In a large mixing bowl, beat the cream cheese until smooth. Add powdered sugar, vanilla extract, and sea salt, mixing until well combined. Add pumpkin puree, heavy cream, cinnamon, nutmeg, cloves, ginger, and allspice into the cream cheese mixture. Beat on low speed until everything is combined. Slowly increase the speed to medium high and whip until medium-stiff peaks. Be careful not to over beat.
    16 ounces cream cheese, 1 1/4 cups powdered sugar, 2 teaspoons pure vanilla extract, 1/8 teaspoon sea salt, 1 cup pumpkin puree, 1 cup heavy whipping cream, 1/2 teaspoon cinnamon, 1/4 teaspoon nutmeg, 1/8 teaspoon cloves, 1/4 teaspoon ginger, 1/8 teaspoon allspice
  • Add to the crust and refrigerate until set.

Add the Topping:

  • Drizzle the melted Biscoff spread (melt for 15-30 seconds in the microwave, you just want it spreadable. Add it to on top of the pumpkin layer. Spread or you can use a spatula or toothpick to create a swirled design.
    1/2 cup melted Biscoff spread

Chill and Serve:

  • Refrigerate for at least 4 hours, or until set. Sprinkle with sea salt, Cut into bars and serve chilled.

Nutrition

Serving: 1serving | Calories: 685kcal | Carbohydrates: 53g | Protein: 7g | Fat: 51g | Saturated Fat: 30g | Polyunsaturated Fat: 4g | Monounsaturated Fat: 12g | Trans Fat: 0.4g | Cholesterol: 108mg | Sodium: 332mg | Potassium: 259mg | Fiber: 2g | Sugar: 37g | Vitamin A: 5638IU | Vitamin C: 1mg | Calcium: 104mg | Iron: 2mg

Apple Galette with Puff Pastry

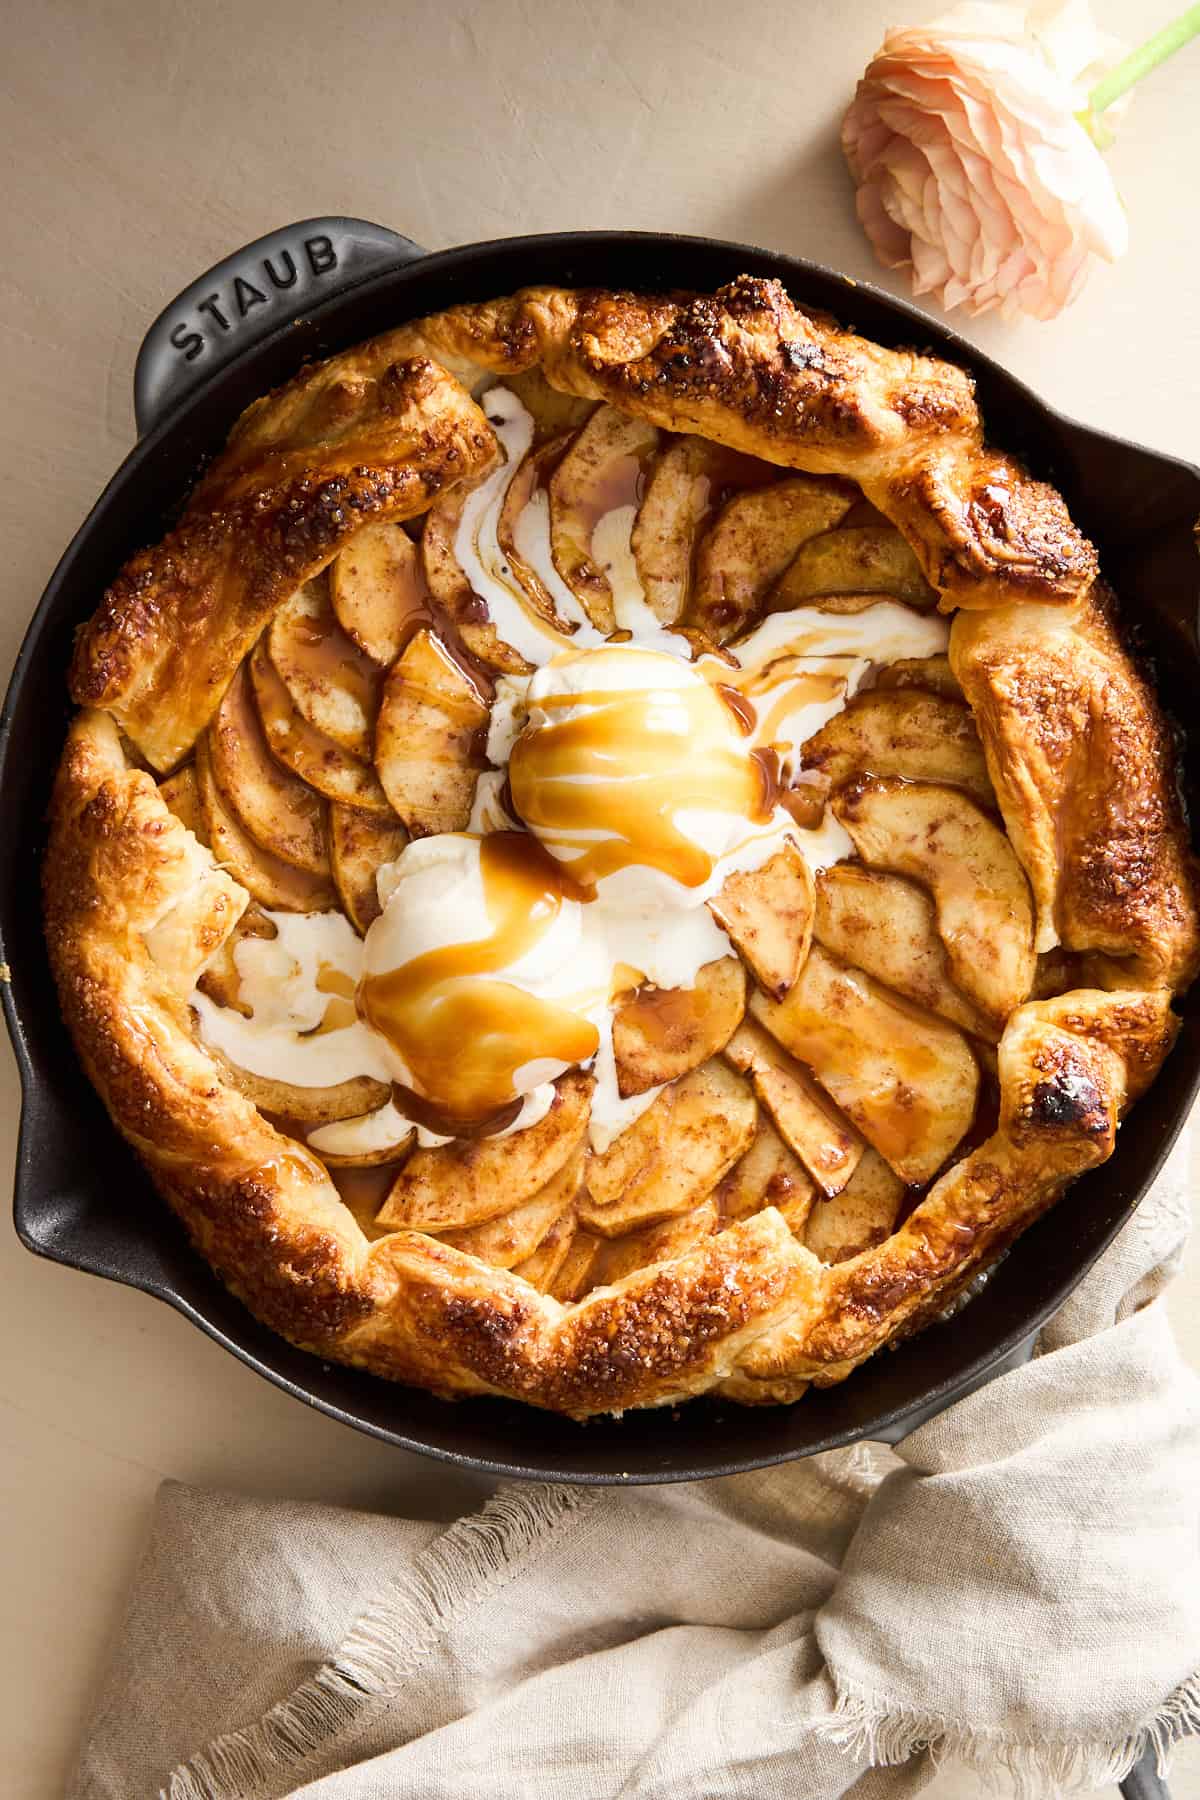
An apple galette topped with ice cream and caramel.Learn how to make this easy apple galette with puff pastry and a sweet apple filling for a quick, crowd-pleasing dessert!
An apple galette topped with ice cream and caramel.

If you’re craving a dessert that’s rustic, warm, and packed with fall flavors, this Apple Galette is the way to go. With its flaky crust and perfectly spiced apples, it’s the kind of treat you’ll want to make again and again.

Apple Galette with Puff Pastry topped with vanilla ice cream and caramel.

What is an Apple Galette?

An apple galette is a rustic, free-form pastry that lets you enjoy the essence of a traditional apple pie without the fuss. Unlike a pie, it doesn’t require a special pan or intricate crust design. You simply roll out the dough, pile the apple filling in the center, and fold the edges over. The result is a beautifully imperfect, golden-brown pastry filled with tender, spiced apples that bubble and caramelize as they bake.

What makes an apple galette special is its versatility and simplicity. The flaky pastry provides a perfect balance to the juicy, cinnamon-scented apples inside. It’s the kind of dessert that feels casual yet elegant, making it just as suitable for a cozy weeknight treat as it is for impressing guests at a dinner party. And whether you pile the apples in haphazardly or arrange them in neat layers, the end result is always delicious!

Ingredients You Need

  • Apples – We used a mix of Granny Smith and Honeycrisp for a balance of tartness and sweetness. Feel free to mix and match your favorite varieties!
  • Brown Sugar – This adds a rich, molasses-like sweetness that pairs perfectly with the tart apples.
  • All-Purpose Flour – Helps to thicken the filling as the apples release their juices. No one wants a runny galette!
  • Fresh Lemon Juice – A squeeze of lemon brightens up the flavors and keeps those apples from turning brown.
  • Ground Cinnamon – This warm spice is a must for any apple dessert. It adds that classic, cozy fall flavor.
  • Ground Nutmeg – Just a pinch gives a nutty, slightly sweet flavor that elevates the spice profile of the filling.
  • Puff Pastry – We love Just Rol puff pastry for its buttery flakiness. It’s quick, easy, and gives you that perfect golden crust without the hassle of making dough from scratch. You can also use any brand that you prefer.

How to Make an Apple Galette

  1. Prepare the apple filling. Add the sliced apples to a large bowl with the brown sugar, flour, lemon juice, cinnamon, and nutmeg and toss to evenly coat. Chill in the fridge while you work on the dough.
  2. Roll out the puff pastry. Flour your work surface. Then, roll the dough into a rough rectangle. If using a skillet, transfer the dough directly into it. Or, you can also easily just roll it onto parchment paper or a silicone mat to avoid having to transfer it.
  3. Fill the galette. Place the seasoned apple mixture onto the center of the dough. You can arrange the apples in a chosen pattern or just pile them up—it’s your call! Just make sure to leave room so that you can fold the dough in. 
  4. Fold the edges. Gently fold the outer edges of the dough over the filling, creating pleats as you go. Use a pastry brush to spread the egg wash on the crust with egg wash. Sprinkle the top with coarse sugar, too, if you like.
  5. Chill the galette. Place the assembled galette in the fridge briefly, or up to 8 hours. This helps the dough hold its shape when it’s baked.
  6. Bake the galette. Then, place the galette in the preheated oven and bake it until the crust is golden brown and the apple filling is bubbling.
  7. Serve and enjoy. Top your warm galette with a drizzle of salted caramel and a scoop of vanilla ice cream for the ultimate fall dessert experience.

Variations

  • Pears – Swap out some of the apples for thinly sliced pears for a different fruity flavor.
  • Maple Syrup – Instead of brown sugar, try maple syrup.
  • Spices – Add a pinch of ground ginger or cardamom for extra warmth.
  • Savory Twist – Replace the apples with thinly sliced potatoes, Gruyère cheese, and herbs for a savory galette. Or just add cheddar cheese for a sweet and savory combination.
  • Nuts – Sprinkle chopped pecans or walnuts over the apple filling for some crunch.
  • Vanilla – A little vanilla extract in the apple mixture adds an extra layer of flavor.

Can I Store Leftovers?

Leftovers can lose some of their crispness, but they’re still delicious when warmed up. To store, refrigerate the galette in an airtight container for up to three days.

You can also freeze the baked galette for up to a month, but be sure to reheat it in the oven for the best results!

More Sweet and Fruity Recipes

Whether we’re using apples and pears in the fall or berries in the spring and summer, we have tons of ways to transform fresh fruit into an impressive dessert or snack!

Ambrosia Fruit Salad

Caramel Apple Bark with Pretzels

Easy Summer Berry Trifle

Easy Peach Crisp Recipe

An apple galette topped with ice cream and caramel.
Print Recipe
No ratings yet

Easy Apple Galette Recipe

Learn how to make this easy apple galette with puff pastry and a sweet apple filling for a quick, crowd-pleasing dessert!
Prep Time10 minutes
Cook Time20 minutes
Chill Time20 minutes
Total Time50 minutes
Course: Dessert
Cuisine: American
Keyword: apple galette, apple galette recipe, apple galette with puff pastry
Servings: 8 servings
Author: Food Dolls

Equipment

Ingredients

  • 4 apples peeled and sliced into 1/4-inch slices (we used a mix of Granny Smith and Honeycrisp)
  • 1/3 cup packed light brown sugar
  • 2 Tablespoons all-purpose flour
  • 2 teaspoons fresh lemon juice
  • 1 teaspoon ground cinnamon
  • 1/4 teaspoon ground nutmeg
  • 1 (13-16 ounce) package refrigerated puff pastry (we like Just Rol)
  • 1 egg, whisked
  • 2 tablespoons coarse sugar

Instructions

  • Preheat oven to 400°F. In a large bowl, toss the apple slices with the brown sugar, flour, lemon juice, cinnamon, and nutmeg until well combined. Cover and set aside. For best results, refrigerate the filling while you prepare the dough.
    4 apples, 1/3 cup packed light brown sugar, 2 Tablespoons all-purpose flour, 2 teaspoons fresh lemon juice, 1 teaspoon ground cinnamon, 1/4 teaspoon ground nutmeg
  • On a lightly floured surface, roll out the puff pastry into a large rectangle (no need for perfection!). Transfer the dough to a 10-inch round skillet, or you can roll it directly onto parchment paper or a silicone baking mat. If the dough is too large, trim the excess and place it in the center of the skillet.
    1 (13-16 ounce) package refrigerated puff pastry (we like Just Rol)
    Puff pastry sheets in a skillet.
  • Fill the Galette: Spoon the apple filling (including any juices) into the center of the dough, leaving a 2-3 inch border around the edges. Arrange the apples however you like—either piled up or in a neat pattern like concentric circles.
  • Fold the edges of the dough over the apples, overlapping and pressing lightly to seal. Brush the crust with egg wash and sprinkle with coarse sugar if desired.
    Puff pastry folded over apple filling in a skillet.
  • Chill the Galette: Refrigerate the assembled galette for 15-20 minutes (or up to 8 hours) before baking. Ensuring the galette is cold before baking helps maintain its shape.
  • Bake: Once chilled, bake the galette in the preheated oven for 35-40 minutes until golden brown and bubbly.
    Apple galette in a skillet.
  • Serve: Enjoy with salted caramel and a scoop of ice cream for an extra indulgent touch!

Nutrition

Serving: 1serving | Calories: 356kcal | Carbohydrates: 36g | Protein: 4g | Fat: 22g | Saturated Fat: 5g | Polyunsaturated Fat: 3g | Monounsaturated Fat: 12g | Sodium: 144mg | Potassium: 52mg | Fiber: 1g | Sugar: 9g | Vitamin A: 2IU | Vitamin C: 1mg | Calcium: 16mg | Iron: 2mg

Dairy Free Mashed Sweet Potatoes

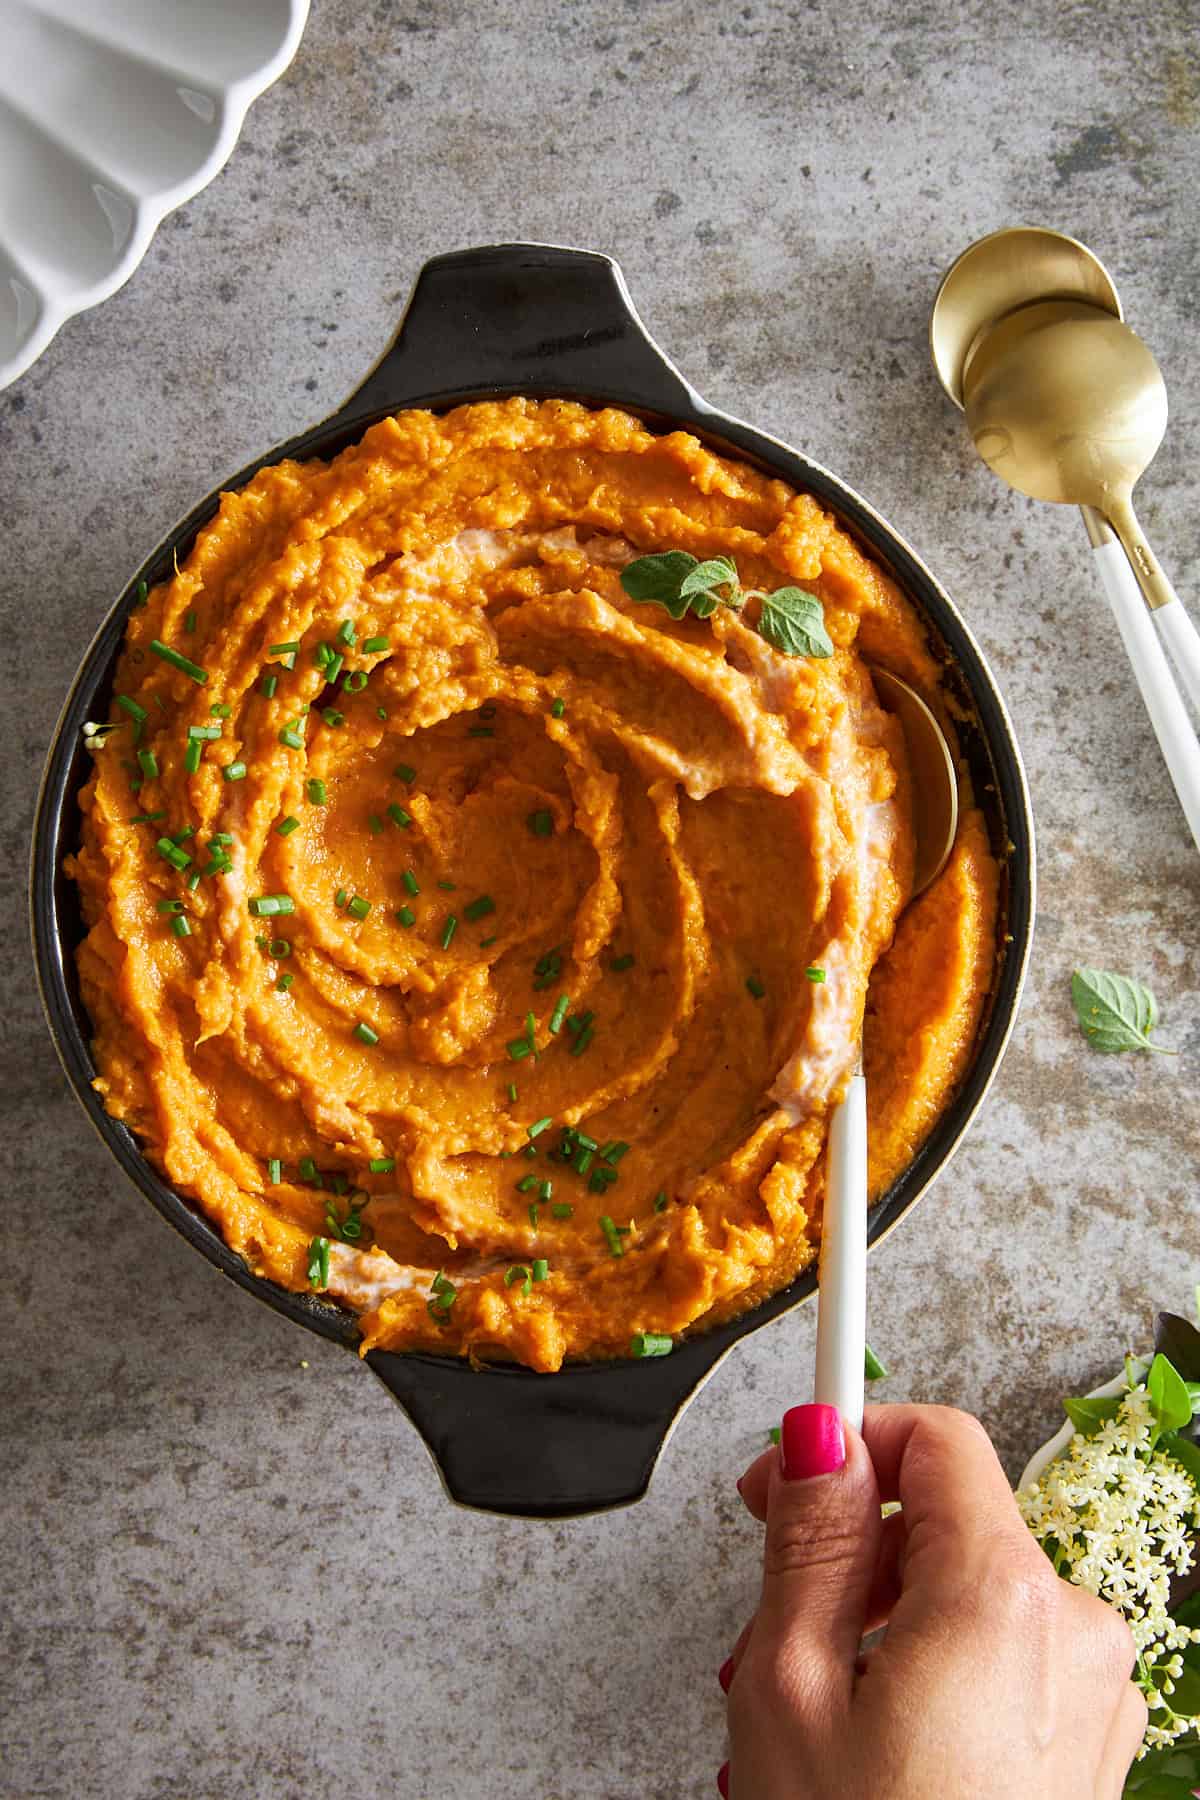
A hand holding a spoon in a bowl of dairy free mashed sweet potatoes.This dairy free mashed sweet potatoes recipe uses coconut milk, maple syrup, and spices to create a sweet side dish with lots of warmth!
A hand holding a spoon in a bowl of dairy free mashed sweet potatoes.

Looking for a side dish that’s rich, creamy, and completely dairy-free? These Dairy Free Mashed Sweet Potatoes bring all the cozy flavors you love with a fun twist that’s perfect for anyone trying to skip the dairy.

A pot of dairy free mashed sweet potatoes.

What are Dairy Free Mashed Sweet Potatoes?

Dairy-free mashed sweet potatoes are the perfect combination of sweet and savory, with an absolutely dreamy texture. Made with naturally sweet potatoes and creamy coconut milk, this dish is a fantastic alternative to traditional mashed potatoes. The addition of warm spices like cinnamon and a hint of ginger takes this side dish to the next level, giving it a subtly spiced kick.

The best part? These mashed sweet potatoes are not only delicious, but they’re also incredibly easy to make. Whether you’re looking to impress at a holiday dinner or just want a wholesome side for a weeknight meal, this recipe is a winner. Plus, they’re naturally gluten-free and vegan-friendly, making them a hit for everyone at the table!

Ingredients You Need

  • Sweet Potatoes – Roasting the sweet potatoes brings out their natural sweetness, giving the mash a deep, caramelized flavor.
  • Full Fat Unsweetened Canned Coconut Milk – This gives the mash its creamy texture without any dairy. 
  • Maple Syrup – A touch of maple syrup enhances the natural sweetness of the potatoes with a subtle caramel flavor.
  • Fresh Ginger – Grating fresh ginger adds a bright, spicy note that balances the sweetness perfectly.
  • Ground Cinnamon – This warm spice deepens the flavor and adds a cozy component to the dish.
  • Cayenne Pepper (Optional) – Just a pinch is all you need, but you can add a lot if you’re feeling adventurous! It gives the dish a little heat to contrast the sweetness.
  • Sea Salt – Salt is a must for balancing all the flavors and bringing out the best in the sweet potatoes and other ingredients.
Coconut milk being poured over baked sweet potatoes in a bowl.

How to Make Dairy Free Mashed Sweet Potatoes

  1. Prep the sweet potatoes. After washing the sweet potatoes, use a fork to poke holes in them.
  2. Roast the sweet potatoes. Place the sweet potatoes on a prepared baking sheet and roast until they are fork-tender.
  3. Cool and peel. Once the sweet potatoes have cooled to a temperature that makes them easy to handle, peel off the skin and place the flesh in a large bowl.
  4. Mash the sweet potatoes. Use a potato masher or a fork to mash the sweet potatoes until they’re smooth and lump-free. 
  5. Mix in the other ingredients. Pour in the coconut milk and maple syrup before shaking the fresh ginger, cinnamon, cayenne pepper (if using), and sea salt into the mashed sweet potatoes. Stir until everything is well combined or use a hand mixer on a low setting to achieve even fluffier and creamy mashed sweet potatoes.
  6. Serve and store. Serve the potatoes immediately or transfer them to a container for storage in the fridge.

Variations

  • Almond Milk – If you prefer a lighter texture, almond milk works perfectly as a substitute.
  • Nutmeg – A pinch of nutmeg can give the dish a warm, earthy flavor that pairs well with cinnamon.
  • Make it savory – Skip the maple syrup and add roasted garlic for a savory twist!
  • Toasted Pecans – For a little crunch, sprinkle toasted pecans on top before serving.
  • Honey – For a slightly different sweetness, swap the maple syrup for honey.

Can I Store Leftovers?

Yes! However, leftover mashed sweet potatoes can get a little thick, so just add a splash of coconut milk when reheating to bring them back to life!

Store them in the fridge in an airtight container for up to 3 days.

If you want to freeze them, they’ll keep for up to 2 months, but be sure to thaw and reheat with extra coconut milk for the best texture.

More Potato-Based Recipes

On the prowl for more dishes that make potatoes the star of the show? Take a peek at some of our other potato-based recipes!

Smashed Potatoes

Labne Crispy Potato Salad

Air Fryer Greek Potatoes

Za’atar Air Fryer Potato Wedges

A hand holding a spoon in a bowl of dairy free mashed sweet potatoes.
Print Recipe
No ratings yet

Dairy Free Mashed Sweet Potatoes

This dairy free mashed sweet potatoes recipe uses coconut milk, maple syrup, and spices to create a sweet side dish with lots of warmth!
Prep Time15 minutes
Cook Time1 hour
Total Time1 hour 15 minutes
Course: Side Dish
Cuisine: American
Keyword: dairy free mashed sweet potatoes, how to make mashed sweet potatoes, mashed sweet potatoes, mashed sweet potatoes recipe
Servings: 4 servings
Author: Food Dolls

Ingredients

  • 4 medium sweet potatoes
  • 3/4 cup full fat unsweetened canned coconut milk plus more if needed
  • 3 Tablespoons maple syrup
  • 1/2 Tablespoon fresh ginger grated
  • 1 teaspoon ground cinnamon
  • 1/4 teaspoon cayenne pepper optional
  • 1/2 teaspoon sea salt

Instructions

Prep and Roast the Sweet Potatoes:

  • Preheat your oven to 400°F (200°C).
  • Wash the sweet potatoes thoroughly and place them on a parchment-lined sheet pan.
    4 medium sweet potatoes
    Four sweet potatoes on a baking sheet.
  • Using a fork, gently press into the sweet potatoes all over to allow the steam to escape.
  • Roast in the oven for 55-60 minutes, or until the sweet potatoes are soft to the touch.
  • Remove from the oven and let cool until they are cool enough to handle.
    Four roasted sweet potatoes on a baking sheet.

Mash the Sweet Potatoes:

  • Once cooled, peel the sweet potatoes and add them to a large bowl.
    Peeled baked sweet potatoes in a bowl.
  • Mash the sweet potatoes with a masher or fork until smooth.

Mix in the Ingredients:

  • Add the unsweetened canned coconut milk, maple syrup, fresh ginger, ground cinnamon, cayenne pepper (if using), and sea salt to the mashed sweet potatoes.
    3/4 cup full fat unsweetened canned coconut milk, 3 Tablespoons maple syrup, 1/2 Tablespoon fresh ginger, 1 teaspoon ground cinnamon, 1/4 teaspoon cayenne pepper, 1/2 teaspoon sea salt
    coconut milk being poured over peeled sweet potatoes.
  • Mix until smooth. For extra fluffy potatoes, use a hand mixer on low speed.
    A bowl of dairy free mashed sweet potatoes.

Adjust Consistency:

  • Add an additional splash of coconut milk until you reach your desired consistency.

Nutrition

Serving: 1serving | Calories: 147kcal | Carbohydrates: 13g | Protein: 1g | Fat: 11g | Saturated Fat: 10g | Polyunsaturated Fat: 0.1g | Monounsaturated Fat: 0.5g | Sodium: 300mg | Potassium: 164mg | Fiber: 1g | Sugar: 11g | Vitamin A: 195IU | Vitamin C: 1mg | Calcium: 29mg | Iron: 1mg

Chocolate Peanut Butter Kunafa (Knafeh)

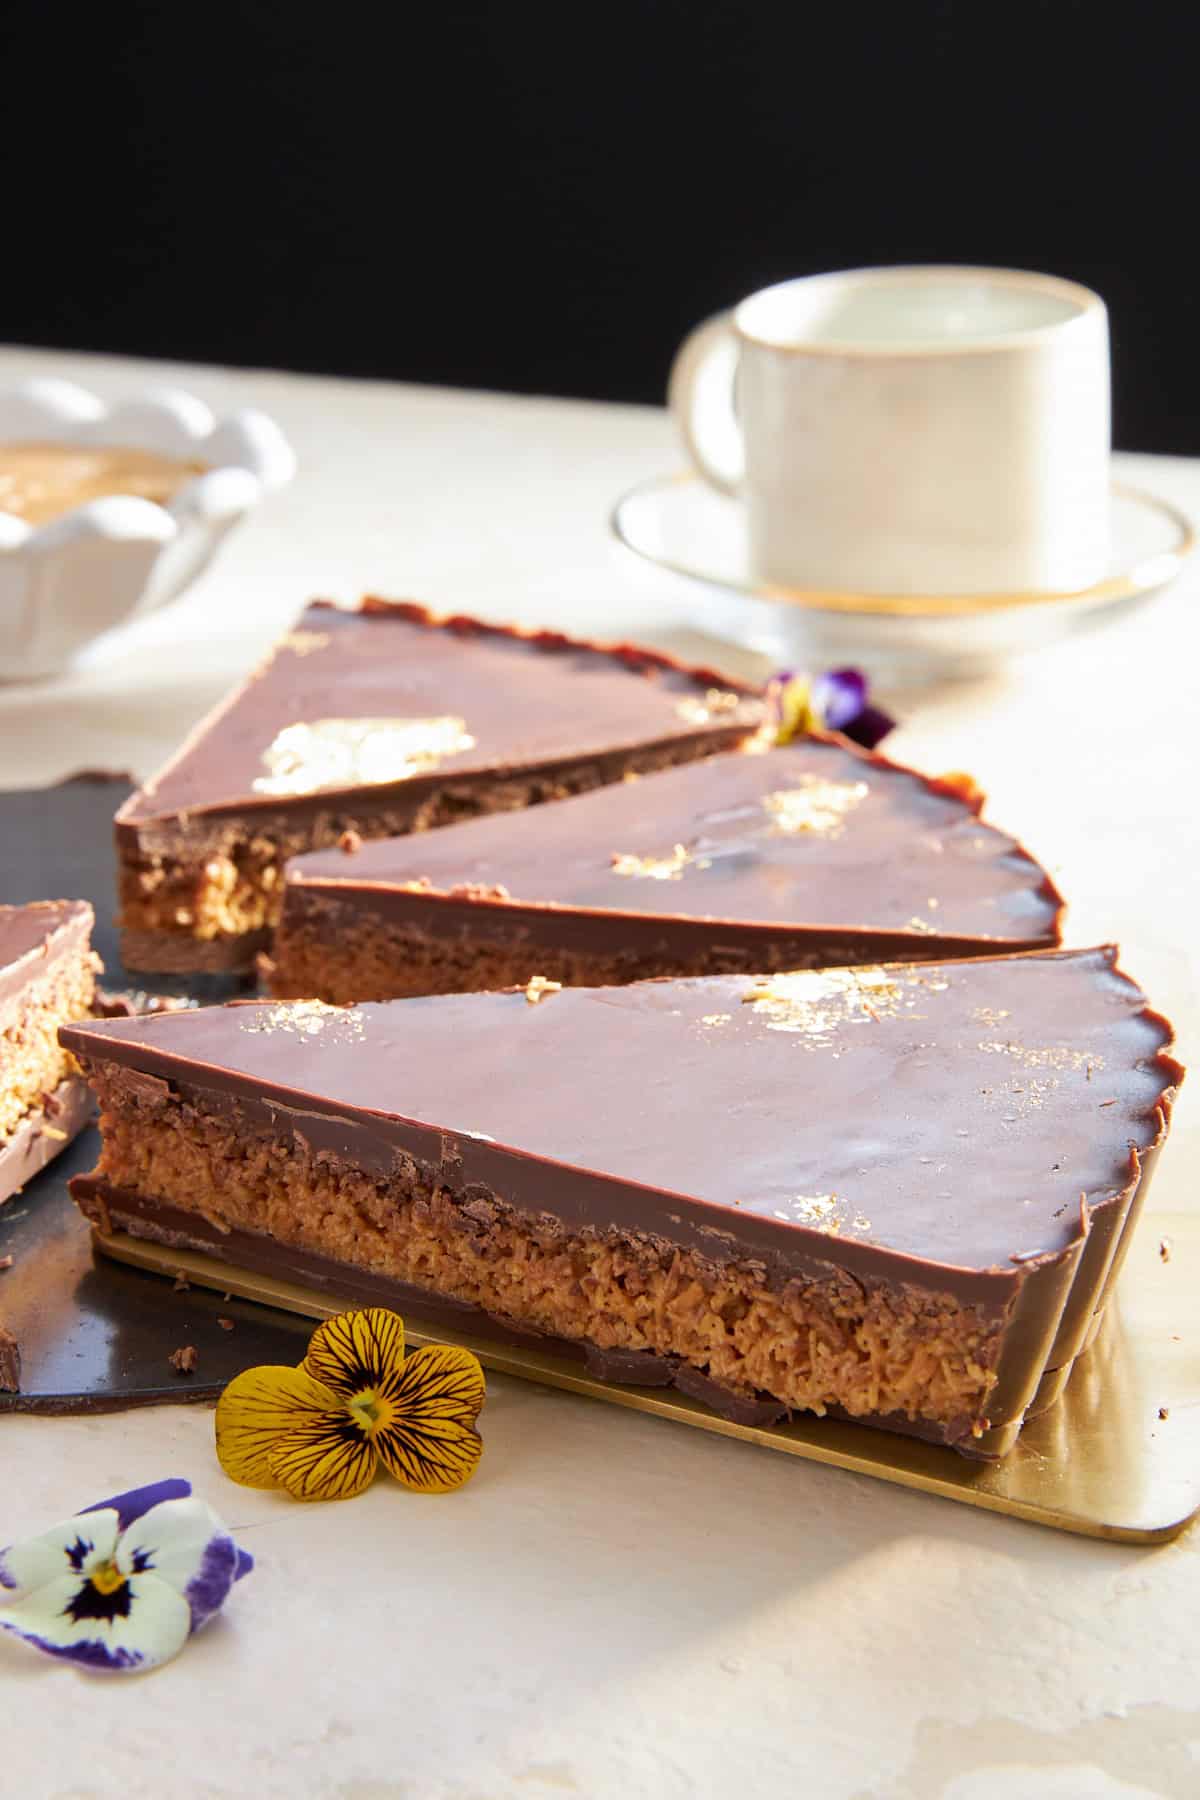
Three slices of chocolate peanut butter kunafa.If you’re looking for a sweet snack that’s simultaneously crunchy and creamy, you’re going to want to run to your…
Three slices of chocolate peanut butter kunafa.

If you’re looking for a sweet snack that’s simultaneously crunchy and creamy, you’re going to want to run to your kitchen to make this Chocolate Peanut Butter Kunafa! While we’re in love with the traditional version of this Middle Eastern dessert, we’ve put our own spin on it to infuse it with some of our own favorite flavors. 

Slices of chocolate peanut butter kunafa.

What is Kunafa?

Kunafa, also known as knafeh, is an absolutely amazing Middle Eastern dessert that dates back to the Ottoman Empire. It typically consists of crispy, shredded phyllo dough that’s sometimes soaked in sweet syrup before being combined with a cheesy or clotted cream-based filling.

You can find tons of twists on this dessert depending on where it’s made — from Egypt or Turkey to Palestine and Lebanon there’s no shortage of variations. For our version, we kick it up a notch by replacing the cheese or cream with peanut butter and wrapping it all in delicious dark chocolate. It’s totally customizable, so you can put your own spin on it, too! 

Overhead image of a chocolate peanut butter kunafa.

Ingredients You Need

  • Dark Chocolate Chips – These beauties bring all the rich, chocolatey goodness to the table!
  • Frozen Shredded Phyllo Dough (Kataifi), Thawed – This is the star of the show — it gives our kunafa that signature crispy, flaky texture.
  • Unsalted Butter – Melted butter gives the phyllo dough its golden crunchiness.
  • Creamy Peanut Butter – Peanut butter gives our kunafa a nutty twist that pairs perfectly with the chocolate, taking our kunafa to the next level.
  • Sea Salt For Garnish – A little sprinkle of sea salt makes all the flavors pop.

How to Make Kunafa

  1. Prepare the Shredded Phyllo. Place the butter in a saucepan and melt before adding the shredded phyllo. Use a wooden spoon to stir the dough until it becomes crispy and browned. Then, use a slotted spoon to remove it from the pan and place it in a bowl. When the crispy dough has cooled to room temperature, add the peanut butter and gently stir until the phyllo is coated. 
  2. Make the Base. Use a double boiler or microwave to melt half of the chocolate. Transfer half to a tart pan before placing the pan in the freezer briefly.
  3. Assemble. Heat the rest of the chocolate until melted and smooth. Place the peanut butter kunafa on top of the chocolate in the tart pan before covering it with the melted chocolate and topping it with sea salt.
  4. Set. Refrigerate the finished kunafa. Once set, cover and store or serve.
A chocolate peanut butter kunafa with four pieces sliced.

Variations

  • Nutella – Swap the peanut butter for Nutella.
  • White Chocolate and Pistachio – Use white chocolate instead of dark chocolate and sprinkle crushed pistachios over top.
  • Caramel – Add a layer of caramel sauce before the chocolate.
  • Mixed Berry – Add a layer of mixed berry jam between the chocolate and phyllo dough for fruity flavor.
  • Almond Butter – Replace the peanut butter with almond butter for a subtle, nutty flavor that pairs perfectly with dark chocolate.
  • Mint – Add a few drops of mint extract to the chocolate for a refreshing, minty variation.
  • Orange – Mix in some orange zest with the chocolate for a citrusy twist that complements the rich chocolate.
  • Coconut – Add shredded coconut to the phyllo dough mixture for a tropical take on the classic kunafa.

Can I Store Leftovers? 

Absolutely! This easy dessert stores well so you can satisfy your sweet tooth throughout the week. 

To refrigerate kunafa, just cover it with plastic wrap or transfer it to an airtight container and store it for 3-4 days. 

For longer storage, wrap it tightly with plastic wrap before also wrapping it with aluminum foil. Freeze it for up to 2 months. Thaw overnight before serving. 

More Decadent Desserts

On the search for more scrumptious sweets? We have you covered with these crave-worthy treats! 

Muhallebi Amardeen Pudding

Tiramisu Eclair Cake

Strawberry Shortcake Shooters

Slow Cooker S’Mores Chocolate Cake

Chocolate peanut butter kunafa slices.
Print Recipe
No ratings yet

Chocolate Peanut Butter Kunafa

If you’re looking for a sweet snack that’s simultaneously crunchy and creamy, you’re going to want to run to your kitchen to make this Chocolate Peanut Butter Kunafa!
Prep Time10 minutes
Cook Time5 minutes
Chill Time30 minutes
Total Time45 minutes
Course: Dessert
Cuisine: American, egyptian
Keyword: kunafa, kunafa recipe
Servings: 4 servings
Author: Food Dolls

Equipment

  • 1 Large Pan
  • 1 Double Boiler (or Microwave-Safe Bowl)
  • 1 (9 inch) Tart Pan

Ingredients

  • 1 stick unsalted butter
  • ½ pound frozen shredded phyllo dough kataifi, thawed
  • 1/3 cup creamy peanut butter
  • 20 ounces semi-sweet or dark chocolate chips
  • 4 teaspoons coconut oil
  • Sea salt for garnish

Instructions

Prepare the Kunafa:

  • Melt the butter in a large pan over medium heat.
    1 stick unsalted butter
  • Gently separate the phyllo dough into small shreds with your fingers until it’s finely shredded. Add the shredded phyllo to the pan, stirring continuously until golden brown.
    ½ pound frozen shredded phyllo dough
  • Remove from heat, transfer to a bowl, and let it cool.
  • Once cooled, mix in the peanut butter until well combined.
    1/3 cup creamy peanut butter

Prepare the Chocolate Base:

  • Melt 10 ounces of the chocolate chips and 2 teaspoons coconut oil using a double boiler or microwave in 30-second intervals, stirring until smooth.
    20 ounces semi-sweet or dark chocolate chips
  • Pour half of the melted chocolate into a small 9-inch tart pan, spreading it evenly to cover the bottom and sides.
  • Place the tart pan in the freezer for 5 minutes to set.

Assemble the Dessert:

  • Once the chocolate base is set, remove the tart pan from the freezer.
  • Evenly spread the peanut butter kunafa mixture over the chocolate base.
  • Melt the remaining dark chocolate with remaining 2 teaspoons coconut oil and pour it over the kunafa layer, ensuring it is fully covered. Sprinkle with flaky sea salt.
    Sea salt

Final Set:

  • Place the assembled tart in the refrigerator until the chocolate is fully set and hard.

Nutrition

Serving: 1serving

Hummus el Sham

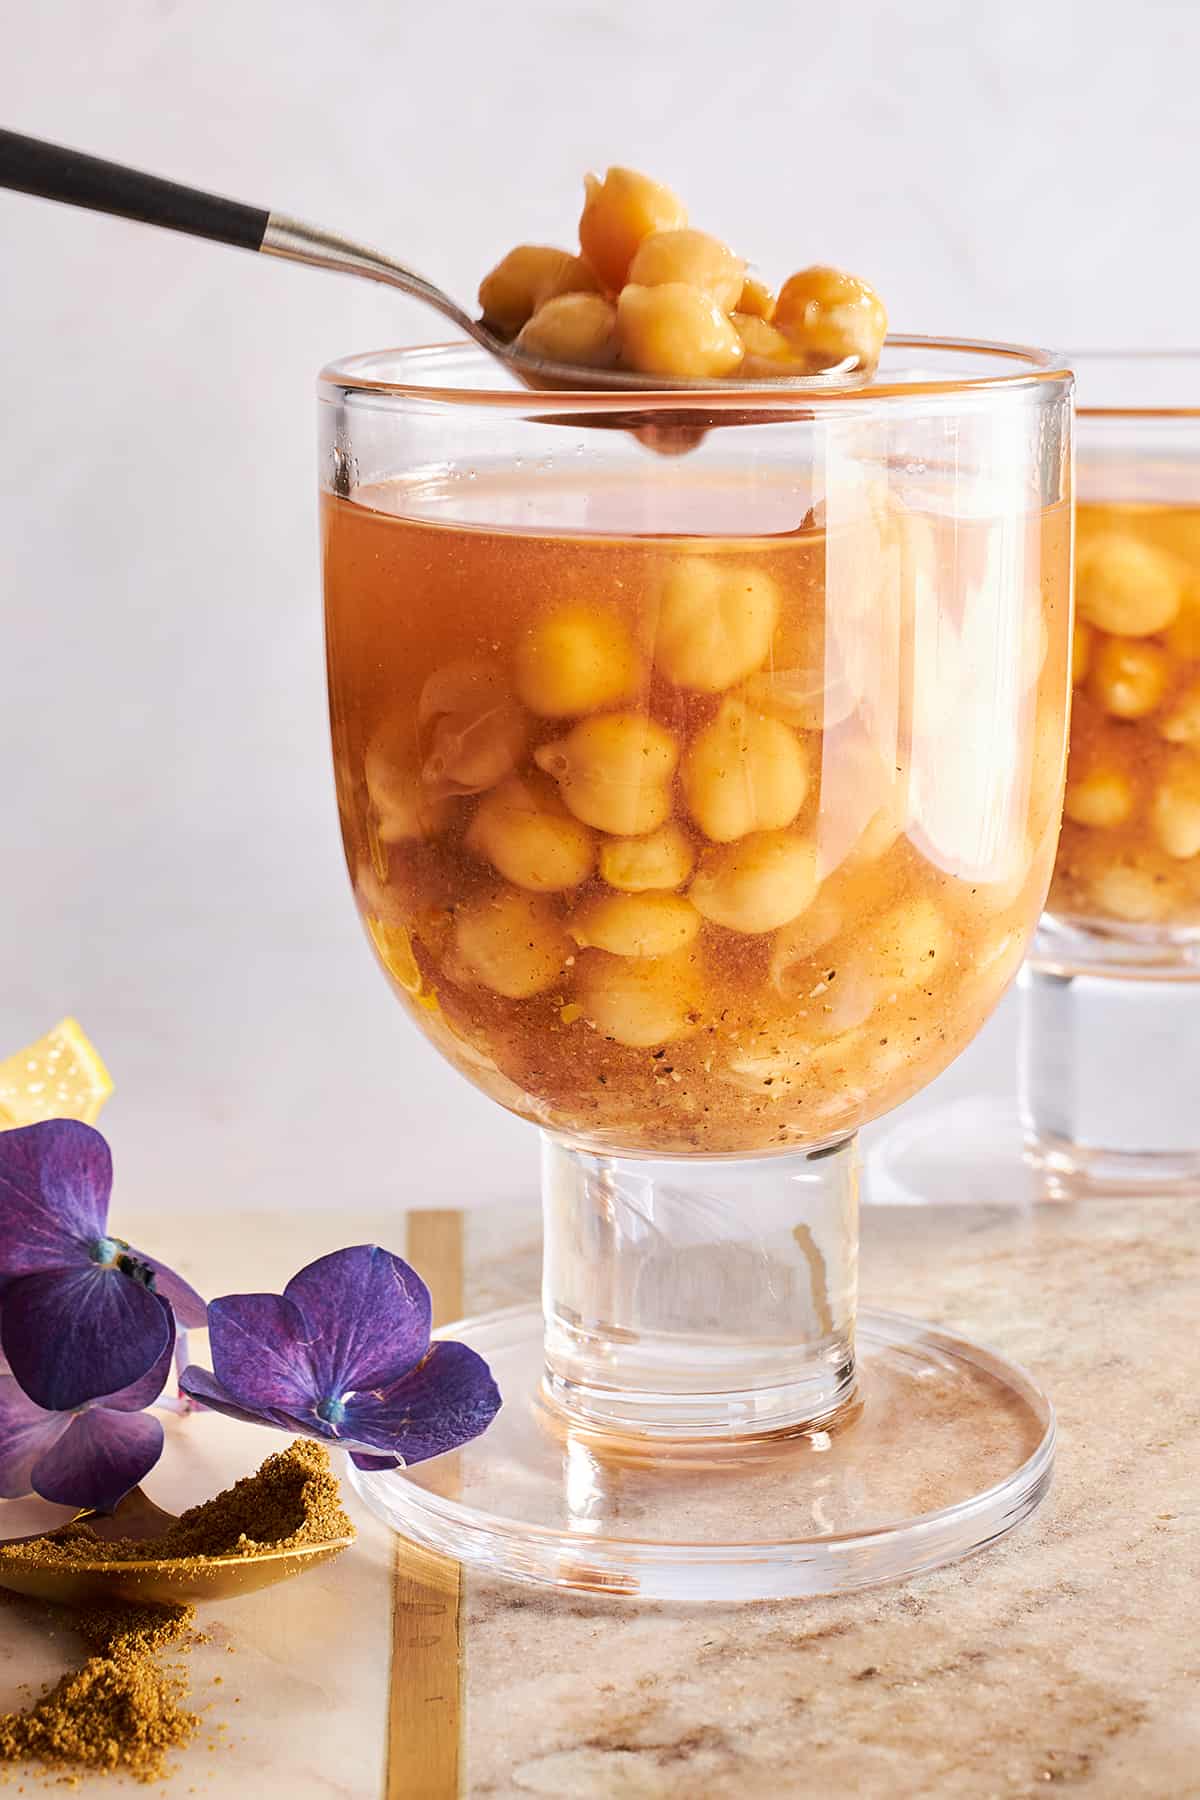
A cup of hummus el sham.If you’re looking for the best way to warm up on a cold day, this Hummus el Sham recipe is…
A cup of hummus el sham.

If you’re looking for the best way to warm up on a cold day, this Hummus el Sham recipe is exactly what you need! This warmly spiced Egyptian recipe is a family favorite that may just have you kissing cocoa and coffee goodbye!

What is Hummus el Sham?

When you hear “hummus el sham” you may be thinking that this is going to be a variation of classic hummus. However, it’s totally different from the dip — instead, it’s a warm and inviting drink or soup! 

Commonly served during the chillier months on Egyptian food carts, hummus el sham is a combination of chickpeas, spices, and aromatics that come together to create a comforting dish that can be slurped by the spoonful or simply sipped from a mug. It’s a nostalgic favorite of ours since our momma made it regularly during the incredibly cold winters here in Minnesota.

Close up image of hummus el sham.

Ingredients You Need

  • Dried chickpeas – These chickpeas are the heart and soul of your hummus el sham! Soaking them overnight helps to soften them up so they’re ready to be boiled, simmered, and savored.
  • Lemon – Fresh lemon juice adds a burst of tangy brightness to your hummus el sham, balancing out the rich flavors and giving it that refreshing zing.
  • Medium garlic cloves – Garlic brings that irresistible savory punch to the table. Just the right amount of minced garlic cloves will infuse classic garlicky goodness.
  • Large ripe tomato – Adding diced ripe tomatoes to your hummus el sham brings a subtle sweetness and just a touch of juicy freshness to the mix!
  • Medium shallot – Shallots offer a milder and sweeter onion flavor compared to regular onions, making them perfect for adding depth without overpowering the other ingredients.
  • Ground cumin – Ground cumin is like the secret spice that ties everything together in your hummus el sham. It adds warm, earthy notes and a hint of smokiness that elevates the overall flavor.
  • Sea salt – A pinch of sea salt is the key to bringing out the flavors of all the ingredients.
  • Black pepper – Freshly ground black pepper adds a subtle kick and gentle heat.
  • Water – Using water during cooking or blending helps achieve the desired consistency of your hummus el sham, ensuring it’s smooth and creamy without being too thick or thin.
  • Crushed red pepper (for garnish) – Sprinkling some crushed red pepper on top adds a spicy kick and some color!
  • Fresh lemon juice (for garnish) – A drizzle of fresh lemon juice as a final garnish not only adds extra zing but also brightens up the colors and flavors of your hummus el sham, making it absolutely irresistible!

How to Make This Super Simple Hummus el Sham

  1. Rinse and soak. Place the chickpeas in a colander and rinse them before placing them in an airtight container with water to soak overnight. 
  2. Drain and cook. Strain all of the water from the soaked chickpeas and transfer them to a large pot. Add water to the pot to cover the chickpeas before also adding the half of a lemon. Then, bring to a boil. 
  3. Skim. Once the chickpeas have become tender, skim the foam from the surface of the water. 
  4. Blend. Add the garlic, diced tomato, chopped shallot, ground cumin, sea salt, black pepper, and remaining water to a food processor or blender and pulse until silky smooth. 
  5. Combine. Transfer the processed mixture to the cooked chickpeas in the pot and use a wooden spoon to completely combine. 
  6. Simmer. Leave the mixture on the stove to continue to simmer so that all of the flavors can come together. 
  7. Serve. Before serving, adjust the salt to taste. Then, ladle into mugs or bowls and garnish with cumin, red pepper, or cayenne pepper powder. 

Variations

While we are already in love with our classic mom-made version of this easy recipe, you can absolutely experiment and make your own! Here are some ideas for inspiration: 

  • Roasted Garlic – Instead of using raw garlic cloves, roast the garlic beforehand for a milder, sweeter flavor. 
  • Harissa – Add a spoonful of harissa paste to the blended mixture for a spicy kick and a vibrant red color. It’s a flavorful twist that adds a Mediterranean flair!
  • Herbs – Blend fresh herbs like parsley, cilantro, or basil into the mixture for a burst of green freshness and herbaceous flavor. 
  • Smokiness – Add a pinch of smoked paprika or chipotle powder for a smoky flavor. 
  • Nuttiness – Mix some tahini or toasted pin nuts into the mixture to add nutty flavor.
  • Citrus – Add more concentrated lemony flavor with a bit of lemon zest! 
  • Spiced Hummus – Experiment with different spices like paprika, cayenne pepper, or za’atar to add layers of flavor! Adjust the spice level to your preference for a personalized touch.

Can I Store Leftovers? 

We don’t often find that we have leftovers of this delicious drink, but if you do, you can store it and reheat it later. 

Transfer any leftover hummus el sham to a mason jar or lidded pitcher and store it in the fridge for 3-4 days

Freeze hummus el sham for up to 3 months in a freezer-safe container and thaw it in the refrigerator. 

More Chickpea-Based Recipes

It’s probably fair to say that we’re obsessed with chickpeas and all the plant-based protein they bring to the table! Check out more of our recipes that take advantage of the goodness of chickpeas: 

Marinated Chickpeas with Whipped Feta

Easy Marinated Chickpeas

Chickpea and Cucumber Tahini Salad

Chickpea Hummus

Ingredients:

A cup of hummus el sham.
Print Recipe
No ratings yet

Hummus el Sham

If you’re looking for the best way to warm up on a cold day, this Hummus el Sham recipe is exactly what you need! This warmly spiced Egyptian recipe is a family favorite that may just have you kissing cocoa and coffee goodbye!
Prep Time10 minutes
Cook Time15 minutes
Soak Time12 hours
Total Time12 hours 25 minutes
Course: beverage, Snack
Cuisine: middle eastern
Keyword: hummus el sham
Servings: 2 servings
Author: Food Dolls

Ingredients

  • 16 ounces dried chickpeas soaked overnight
  • 1/2 lemon
  • Water for cooking
  • 3 medium garlic cloves
  • 1 large ripe tomato diced
  • 1 medium shallot chopped
  • 1 teaspoon ground cumin
  • 1 1/2 teaspoon sea salt
  • 1 teaspoon black pepper
  • Crushed red pepper for garnish
  • Fresh lemon juice for garnish

Instructions

  • Rinse chickpeas and soak overnight in water. Drain and place them in a pot and cover with fresh water, ensuring they are completely submerged. Add half lemon into the pot.
    16 ounces dried chickpeas, 1/2 lemon, Water
  • Bring the pot of chickpeas to a boil, then reduce the heat to medium-low and simmer for about 15 minutes, or until the chickpeas are tender. Skim off any foam that rises to the surface.
  • In a food processor, combine the garlic, diced tomato, chopped shallot, ground cumin, sea salt, black pepper, and 1/4 cup of water. Process until smooth.
    3 medium garlic cloves, 1 large ripe tomato, 1 medium shallot, 1 teaspoon ground cumin, 1 1/2 teaspoon sea salt, 1 teaspoon black pepper
  • Once the chickpeas are cooked, add the processed mixture to the pot with the chickpeas. Stir well to combine.
  • Continue to simmer the mixture for another 30 minutes to allow the flavors to meld together.
  • To serve, ladle the hummus into serving bowls. Garnish each serving with a sprinkle of ground cumin, crushed red pepper or cayenne pepper, and a squeeze of fresh lemon juice. Adjust salt to taste.
    Crushed red pepper, Fresh lemon juice

Nutrition

Serving: 1serving | Calories: 1733kcal | Carbohydrates: 294g | Protein: 91g | Fat: 28g | Saturated Fat: 3g | Polyunsaturated Fat: 12g | Monounsaturated Fat: 7g | Sodium: 3613mg | Potassium: 4518mg | Fiber: 84g | Sugar: 55g | Vitamin A: 1379IU | Vitamin C: 69mg | Calcium: 558mg | Iron: 31mg

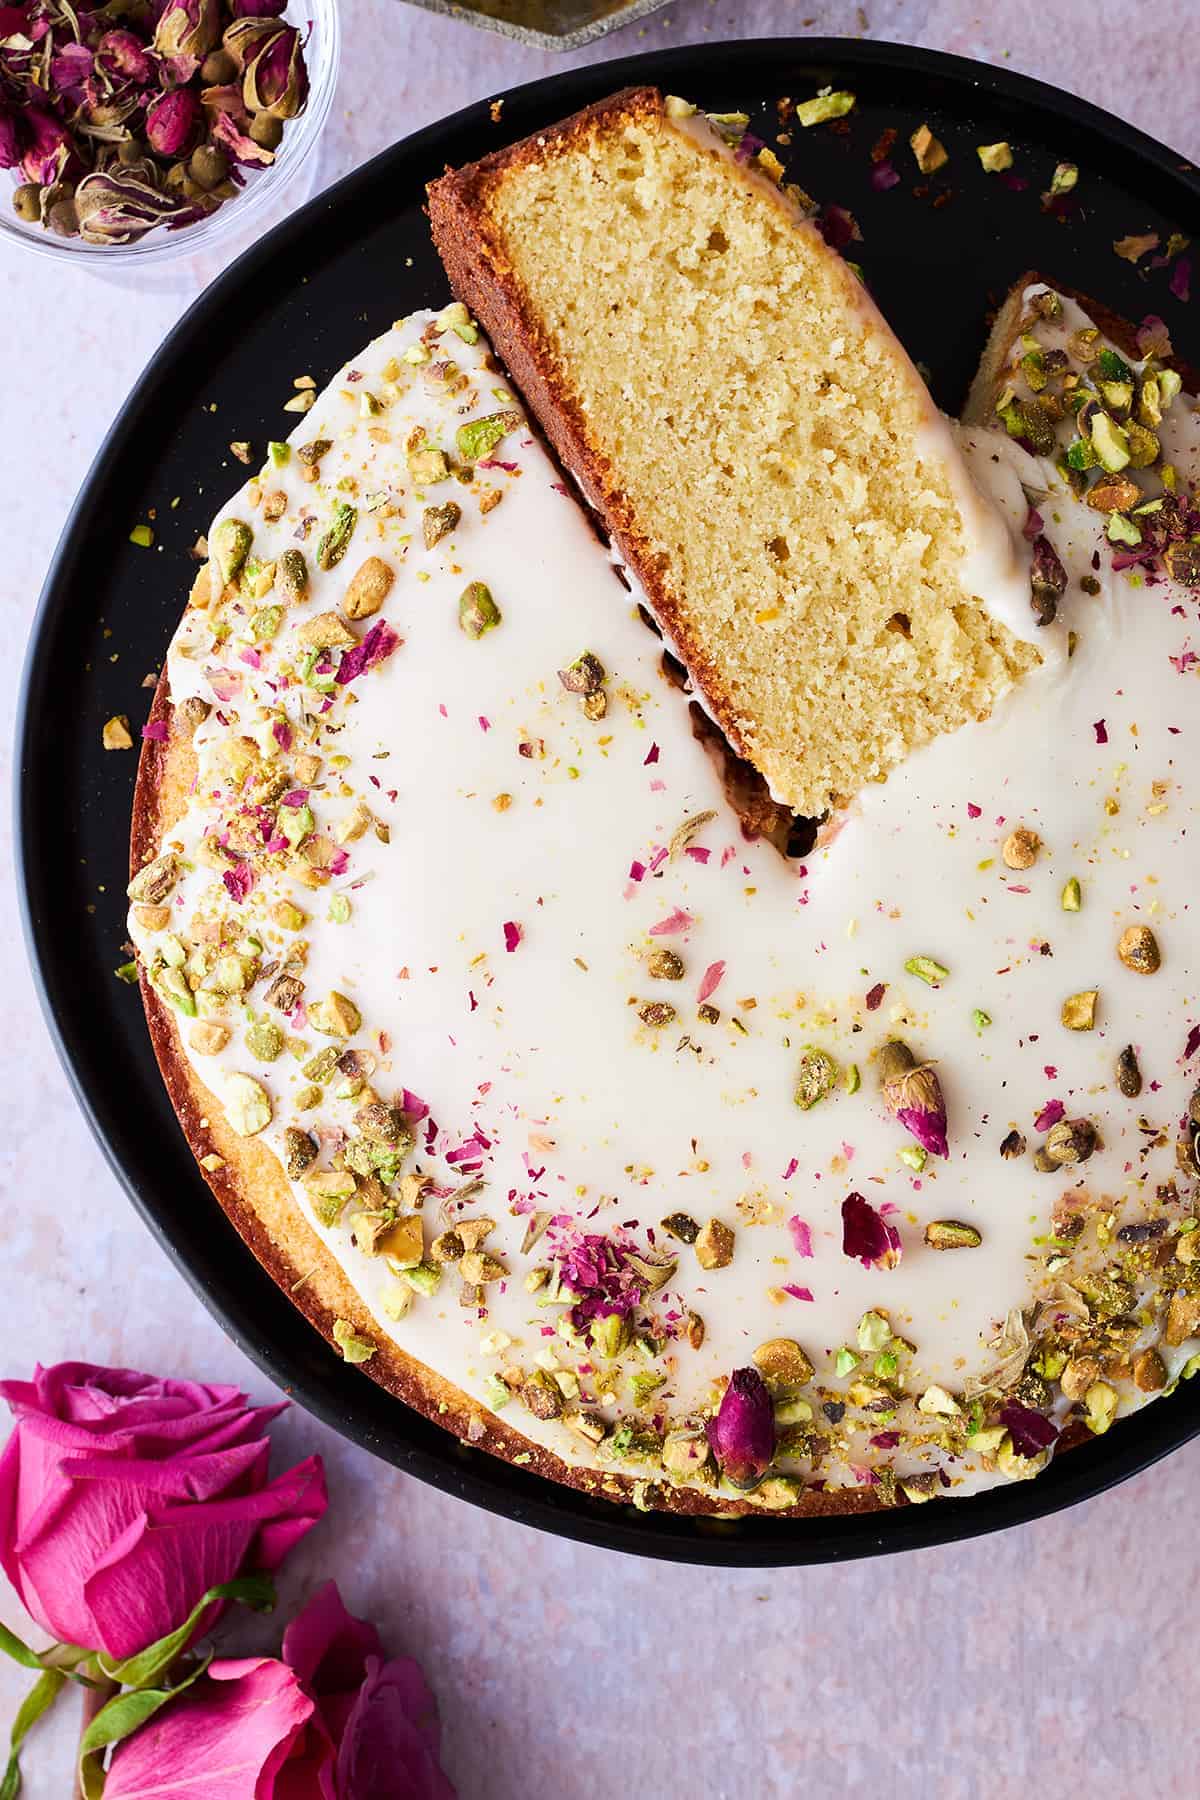
Persian Love Cake

Persian love cake with a piece on its side.Our Persian Love Cake recipe is nothing short of heavenly! This gorgeous cake features a light and subtly spiced batter…

Persian love cake with a piece on its side.

Our Persian Love Cake recipe is nothing short of heavenly! This gorgeous cake features a light and subtly spiced batter that’s a total treat for your taste buds. Then, it’s topped with a luscious orange citrus glaze, delicate rose petals, and crunchy crushed pistachios.

Perfect for special occasions or as a scrumptious everyday snack, our Persian love cake is as much a feast for your taste buds as it is for your eyes!

Persian love cake with a piece on its side.

What Is Persian Love Cake? 

A popular dessert, Persian love cake is a light, moist cake. Unlike any other desert, it is flavored with notes of bright citrus, warm cardamom and cinnamon, and floral rosewater. 

Then, it is finished with orange glaze, rose petals, and crushed pistachios. The result is a beautiful sweet cake that is packed full of flavor without being overpowering. 

What is the History of Love Cake? 

The exact origins of love cake are unknown, but there are many theories. One thought is that is an adaptation of Portuguese love cake which was transformed into semolina cake often served during Christmastime. 

From Sri Lanka, where the cake was turned into Semolina, the recipe is said to have made its way to Iran. There, it was flavored with rosewater. 

That said, many Iranians are not actually familiar with Persian love cake and only learn about it through Western influence. So, who knows how the cake actually came about!

Either way, we’re glad it did because its flavor is truly unlike anything else. The sweet, soft dessert is perfect for Mother’s Day, spring celebrations, Christmas, and every event in between! 

A Persian love cake topped with orange glaze, rose petals, and pistachios.

What Is Love Cake Made Of? 

Most of the ingredients in this recipe are baking staples that can easily be found at your local grocery store! Here’s an overview of what you need: 

For the Cake

  • Butter – We recommend using unsalted butter for baking. 
  • Sugar – Granulated sugar adds the perfect touch of sweetness to the batter. 
  • Eggs – These add a rich taste and help the cake hold its shape. 
  • Spices – Cardamom, ground cinnamon, and ground cloves create the warm flavor Persian love cake is known for.  
  • Flour – A combination of all-purpose flour and almond flour forms the base of the cake, keeping it light with a slightly earthy taste. 
  • Orange – Orange juice and orange zest infuse the batter with a bright, citrus flavor. 
  • Rose Water – This adds a floral taste. Find it in the baking or international food aisles of your local grocery store. Or, purchase rose flower water online
  • Yogurt – Full-fat plain yogurt adds a tender crumb and a delicious tangy flavor. 

For the Topping

  • Confectioner’s Sugar – Also known as powdered sugar. Granulated sugar will not work for the icing! 
  • Orange Juice – Freshly squeezed is best! 
  • Garnishes Dried rose petals and crushed pistachios create a bakery-worthy appearance! 
Persian love cake with pieces missing and one piece sliced.

Cake Directions So Simple You’ll Fall in Love! 

Before you begin, preheat your oven. Then, grease a springform pan, and line it with parchment paper

  1. Beat the butter and sugar. Add the butter and sugar to a large mixing bowl, and beat until fluffy. 
  2. Add the wet ingredients. Beat the eggs in one at a time, scraping the sides of the bowl in between. Then, mix in the yogurt, orange zest, orange juice, rose water, and vanilla extract. 
  3. Mix the dry ingredients. In a separate bowl, combine the all-purpose flour, almond flour, baking powder, cardamom, cinnamon, cloves, and salt. 
  4. Combine the wet and dry ingredients. Working slowly, mix the dry ingredients in with the bowl of wet ingredients just until smooth. 
  5. Bake. Pour the batter into the prepared cake pan, spreading it out evenly. Bake until the cake is set and a toothpick inserted into the center comes out clean. 
  6. Cool. Transfer the pan to a wire rack, and let the cake cool slightly. Then, invert it onto a platter to cool completely. 
  7. Prepare the topping. In a small bowl, whisk together the confectioner’s sugar and fresh orange juice until smooth. 
  8. Garnish. Spoon the icing over the cake. Then, sprinkle the garnishes on top. 
We earn a commission if you make a purchase, at no additional cost to you.
03/20/2024 05:20 pm GMT

Tips for Success

  • Avoid Overmixing. Be careful to combine the ingredients just until smooth. Continuing to mix will result in a dense, tough cake. 
  • Don’t Use Almond Meal. Almond meal and almond flour are not the same things! Almond meal still contains some of the almond skins, which will impact the texture of your cake. 
  • Cool the Cake. Do not ice your cake before it cools completely! Doing so will cause the glaze to run all over the place. 
Side view of an iced Persian love cake slice.

Why Did My Love Cake Sink in the Middle? 

Overmixing the batter is the most common cause for your cake to sink in the middle. Be sure to mix just until smooth, and allow it to cool completely!

How to Store

Store leftover cake in an airtight container in the refrigerator for up to five days. Allow it to come to room temperature before serving. 

More Cake Recipes 

If you’re like us, and can’t ever have too many cake recipes up your sleeve, here are some more of our favorites!

Persian love cake with a piece on its side.
Print Recipe
5 from 1 vote

Persian Love Cake

Make this easy Persian love cake recipe with simple ingredients for a light, fluffy cake full of floral, citrus flavor!
Prep Time15 minutes
Cook Time45 minutes
Total Time1 hour
Course: Dessert
Cuisine: middle eastern, Persian
Keyword: persian love cake, persian love cake recipe
Servings: 12 servings
Author: Food Dolls

Ingredients

Cake:

  • 1 3/4 sticks 14 Tablespoons unsalted butter, at room temperature
  • 1 1/4 cup granulated sugar
  • 4 large eggs at room temperature
  • 1/2 cup full-fat plain yogurt
  • Zest of 1 orange
  • 3 Tablespoons fresh squeezed orange juice
  • 1 Tablespoon rose water optional
  • 2 teaspoons vanilla extract
  • 1 1/2 cups all-purpose flour sifted
  • 1 3/4 cups almond flour
  • 1 1/2 teaspoons baking powder
  • 1 teaspoon ground cardamom
  • 1/2 teaspoon ground cinnamon
  • 1/8 teaspoon ground cloves
  • 1/2 teaspoon sea salt

Icing:

  • 1 1/4 cups confectioners’ sugar
  • 1-2 Tablespoons fresh orange juice

Garnish:

  • Chopped pistachios and dried rose petals optional

Instructions

  • Preheat the oven to 325 degrees Fahrenheit. Grease a 9-inch springform pan, and line it with parchment paper.
  • In a large mixing bowl, using a hand mixer or stand mixer, beat the butter and granulated sugar until fluffy.
    1 3/4 sticks, 1 1/4 cup granulated sugar
  • Add the eggs one at a time, beating well after each addition. Then mix in the yogurt, orange zest, orange juice, rose water (if using), and vanilla extract until combined.
    4 large eggs, 1/2 cup full-fat plain yogurt, Zest of 1 orange, 3 Tablespoons fresh squeezed orange juice, 1 Tablespoon rose water, 2 teaspoons vanilla extract
  • In a separate bowl, combine the all-purpose flour, almond flour, baking powder, cardamom, cinnamon, cloves, and salt.
    1 1/2 cups all-purpose flour, 1 1/2 teaspoons baking powder, 1 teaspoon ground cardamom, 1/2 teaspoon ground cinnamon, 1/8 teaspoon ground cloves, 1/2 teaspoon sea salt, 1 3/4 cups almond flour
  • Gradually add the dry ingredients to the wet ingredients, mixing until just combined. Be careful not to overmix.
  • Pour the batter into the prepared pan and spread it evenly.
  • Bake for about 45 minutes, or until the cake is set and a toothpick inserted into the center comes out clean.
  • Remove the cake from the oven and transfer the pan to a wire rack. Let it cool slightly and invert onto a platter and cool completely.
  • In a small bowl, whisk together the confectioners’ sugar and fresh orange juice until smooth.
    1 1/4 cups confectioners’ sugar, 1-2 Tablespoons fresh orange juice
  • Spoon the icing over the cooled cake. Garnish with chopped pistachios and dried rose petals.
    Chopped pistachios and dried rose petals

Nutrition

Serving: 1serving | Calories: 263kcal | Carbohydrates: 51g | Protein: 7g | Fat: 10g | Saturated Fat: 1g | Polyunsaturated Fat: 0.4g | Monounsaturated Fat: 1g | Trans Fat: 0.01g | Cholesterol: 56mg | Sodium: 177mg | Potassium: 71mg | Fiber: 2g | Sugar: 23g | Vitamin A: 104IU | Vitamin C: 4mg | Calcium: 89mg | Iron: 2mg