Irish Coffee

This classic Irish coffee recipe is easy to make with 4 ingredients in just a few minutes. Always so warm and cozy! Let’s warm up with a hot mug of Irish coffee! ♡ This classic 4-ingredient cocktail is always such a fun and cozy drink to serve during the wintertime — especially if you’re making […]

This classic Irish coffee recipe is easy to make with 4 ingredients in just a few minutes. Always so warm and cozy!

Let’s warm up with a hot mug of Irish coffee! ♡

This classic 4-ingredient cocktail is always such a fun and cozy drink to serve during the wintertime — especially if you’re making a big round of drinks for a group — and it’s very simple and straightforward to make as well. Simply brew up your favorite coffee, mix it with a shot of Irish whiskey, add in your desired amount of sweetener, and top with a generous dollop of whipped cream. (I also highly recommend adding some chocolate or nutmeg shavings on top too!)

If you happen to be sensitive to caffeine in the evenings like I am, you’re more than welcome to brew a pot of decaf to make these cocktails caffeine-free. And if you’re looking for a fun twist on the classic, it can also be fun to swap whipped cream for a scoop of melty vanilla ice cream and serve these as floats instead.

Let’s make some Irish coffee! (more…)

Coffee Caramel Panna Cotta

Two of my favorite flavors come together right here, in this Coffee Caramel Panna Cotta, which offers up the rich flavor of caramel with a few strong shots of espresso. I seem to have good caramel karma and when I baked professionally, the executive pastry chef at one restaurant told me that I was the one she wanted to make the caramel desserts since I…

Two of my favorite flavors come together right here, in this Coffee Caramel Panna Cotta, which offers up the rich flavor of caramel with a few strong shots of espresso. I seem to have good caramel karma and when I baked professionally, the executive pastry chef at one restaurant told me that I was the one she wanted to make the caramel desserts since I had a knack for getting caramel just right.

While I was flattered, in reality, caramel isn’t that hard to make. Like riding a bike, or when you wake up one morning and they upgrade the software on your phone for whatever reason, there’s a learning curve. (However, I still haven’t figured out how to use my photo editing software. Someone recommended a book that’s a whopping 533 pages long, but honestly, can’t they just make these things more intuitive?)

Unlike unintuitive tech, once you get the hang of making caramel, you know the pitfalls and issues that can arise, and you’ll feel like a pro when you take a taste of the finished caramel dessert and realize – whether a chef tells you so or not – that you’ve done a good job. You are a good person, and I know you can do it, too!

Here I use a dry caramel with no liquid added; it’s just sugar. The picture above may look scary, as in “What do I do wrong?” But dry caramel is pretty foolproof. I’ve given tips on making caramel here, but the basic action starts with spreading the sugar in a wide pan or deep saucepan (use a good-quality one for best results as thin pots and pans don’t heat evenly), heating it until it starts to liquify, then stirring it gently as you go, until it’s completely liquified.

Once it’s liquified, keep gently stirring it, and start watching carefully as things will now move quickly and you want to pay close attention to what’s going on in the pan. Don’t let anything distract you as a few seconds can make all the difference. Make sure the warm cream ready to go.

The caramel quickly goes from what it looks like above, to what it looks like below. When the caramel is bubbly, amber-colored (the color of an old penny), and smells just slightly smoky – as in, if you let it go a few more seconds, it’ll burn – turn off the heat and immediately add the warm cream to stop the cooking.

You want to get it to just the right color, aroma, and flavor where it’s cooked enough so it’s in the middle ground between being not sugary sweet, but not burned either. (I recently did a caramel video tutorial on Instagram that you might find interesting where I explain and demonstrate it in detail.)

Once the caramel is done, and the cream has been added, it’s hard not to want to pour the caramel below in a bowl and spoon the whole thing up. Right?

I made this Coffee Caramel Panna Cotta recipe a few times the past week, playing around with different amounts of espresso and caramel. The caramel made with 3/4 cup (150g) sugar is more caramel-forward and made the coffee flavor a little less-prominent in the finished panna cotta. So I gave you a range to choose from in the recipe.

Panna cotta is different than its custardy counterparts as it’s made with gelatin rather than eggs. There’s no water bath or constant checking in the oven to check for doneness. Although the name in Italian means “cooked cream,” the dessert has a relatively light profile since whole milk is used, rather than all cream. Here I use just enough cream to ‘stop’ the caramel (whole milk can curdle in caramel) then I add whole milk later, although lowfat will work, too. I’m not against lowfat milk. Nor am I against decaf if you want to use that.

When I had to give up coffee for a while, I turned to an instant roasted grain-based substitute, which can fill in for coffee in baking, too. Just make it as strong as espresso. Most natural food stores and well-stocked supermarkets carry different brands of them. If anyone gives you a hard time for not drinking coffee, which happened to me when I had to give it up, many espresso bars in Italy offer caffè d’orzo made with roasted barley. And anyone who wants to argue with Italians about anything coffee-related, let me tell you, it will not end in your favor.

Once you’ve mastered caramel, chocolate curls are always fun to try, which you can make by either scraping a chef’s knife down a bar of milk or dark chocolate. If using dark, use one that’s not too cold or the curls will shatter. Pastry chefs will sometimes rub a chocolate bar briskly up and down with their (clean and dry) hands to warm it up a bit before trying to make curls.

Place the block longwise at the edge of the counter you’re standing at and, holding the bar in place against you with your waist, holding the handle and the top of the blade, scrape curls toward you with the knife at a near 90º angle, angling the blade just a bit away from you as you drag it down. You don’t have to press down very hard and after few tries, you’ll find the angle and pressure that works best for you. Of course, be careful dragging the knife toward you and make sure the blade is facing away from you. You can also use a sharp swivel-bladed vegetable peeler and make shorter curls by running it down the long side of a chocolate bar. Once again, milk chocolate is softer and easier to use than dark if you want more cohesive curls. But there’s no shame in shards, either.

As mentioned, I made a few batches of this Coffee Caramel Panna Cotta before settling on the proportions here. I know some of you may have questions about using gelatin and gelatin substitutes, which I answered here. In Europe, sheet gelatin is more prevalent but sheets vary in size and in strength, ranging between five different strengths. The best approximation here would be to use two sheets of gelatin: a general rule is 3 sheets of gelatin equals one 1/4 ounce (7g) envelope gelatin. To use sheets here, soften them in a bowl of cold water for a few minutes then wring them out and add them to the warm (not boiling hot) caramel mixture after you’ve added the cream.

Print

Coffee Caramel Panna Cotta

If you want a fuller caramel flavor, use the 3/4 cup (150g) of sugar to caramelize in step 2. The caramel flavor will be a bit more pronounced than the coffee flavor but I tried it both ways and like it, for different reasons. And you can use lowfat milk rather than whole milk, although it'll be less-smooth, but I wouldn't call this an overly rich dessert.
It goes without saying that the stronger the espresso, the more forceful the coffee flavor will be. I tried it with a few long (allongé or lungo) shots of espresso as well as espresso made in a moka pot, and both were good. If you don't have an espresso maker, use good-quality instant espresso powder dissolved in hot water. Taste and make sure it's quite strong as it'll be diluted later with the other ingredients. I've mentioned some coffee alternatives in the post.
I've not had experience using agar-agar, but fish-based gelatin is available and is said to work the same as standard gelatin. For more on gelatin, including using sheet gelatin, check my post on how to use gelatin. If you do try sheet gelatin, or another type, feel free to share how they work out in the comments.
When done, because these aren't baked, you can simply pour the finished mixture into coffee or espresso cups or other decorative glasses. The number of servings will depend on how large or small you make them. The recipe plug-in I use to write up recipes so they're printable doesn't allow me to add a range of serving sizes (which I learned when they kept disappearing after I added them...) but this recipe will make 4 to 6 servings.
Course Dessert
Servings 4 servings

Ingredients

  • 1 cup (250ml) whole milk (lowfat can be used)
  • 1 1/2 teaspoons unflavored powdered gelatin
  • 2/3 - 3/4 cup (130-150g) sugar (see headnote)
  • 3/4 cup (180ml) heavy cream warmed
  • 1/3 cup (80ml) liquid espresso
  • 1/2 teaspoon vanilla extract
  • pinch of salt

Instructions

  • Pour 1/2 cup (125ml) of cold milk in a small bowl and sprinkle the gelatin granules over it in an even layer. Set aside for at least 5 minutes to allow the gelatin to soften.
  • Spread the sugar in an even layer in a medium skillet or wide, deep saucepan. Warm the sugar over medium heat until it starts to liquify. (Generally it'll start to liquify in certain spots, depending on your pan.) When it starts to melt, gently stir the sugar with a heatproof utensil so it liquifies evenly. It will get grainy as you stir it, but as you continue to cook it, it should smooth out as it begins to take on a light amber color.
  • Continue to cook the sugar, swirling the pan more than stirring it, until the caramel starts to smoke and is a deep amber color. Smell the caramel and when it just starts to smell smoky, turn off the heat and add the warm cream gradually, stirring, until it's incorporated into the caramel. If there are any lumps, continue to stir the mixture until the lumps are melted. (You may need to rewarm the mixture over very low heat to get them all melted.)
  • When the mixture is cooled down a bit, until it's the temperature of a very warm cup of coffee, add the softened gelatin and stir until dissolved, then stir in the remaining 1/2 cup (125ml) of milk, espresso, vanilla, and salt.
  • Transfer the mixture to a large measuring cup so it's easier to pour, and divide it into custard cups or glasses. Depending on the size of servings you want, choose whatever cups or glasses you'd like to use. Chill until firm, about 6 to 8 hours, or overnight.

Notes

Serving: Serve the custards cold, on their own or with a dollop of whipped cream. They can be decorated with chocolate shavings, a sprinkle of cocoa powder, or toasted sliced almonds.
Storage: The custards will keep for up to five days in the refrigerator. 

Vegan Halloween Cookies

These fun vegan Halloween cookies are soft and chewy on the inside, crispy on the outside, and full of sweet flavor! Using creamy dark chocolate chips, colorful M&M candies, and Dutch cocoa powder, they are a chocolate lover’s dream. Serve th…

These fun vegan Halloween cookies are soft and chewy on the inside, crispy on the outside, and full of sweet flavor! Using creamy dark chocolate chips, colorful M&M candies, and Dutch cocoa powder, they are a chocolate lover’s dream. Serve them at your next Halloween party, add them to trick-or-treat bags, or save them for...

Read More

The post Vegan Halloween Cookies appeared first on My Pure Plants.

Iced Shaken Espresso

Enjoy a coffeehouse favorite at home with this iced shaken espresso. Flavored with brown sugar and finished with your favorite milk, this is an easy and delicious way to enjoy your morning coffee or an afternoon pick-me-up. I probably should have called this “Starbucks at home” week, because that’s what it has become. Earlier this …

The post Iced Shaken Espresso appeared first on My Baking Addiction.

Enjoy a coffeehouse favorite at home with this iced shaken espresso. Flavored with brown sugar and finished with your favorite milk, this is an easy and delicious way to enjoy your morning coffee or an afternoon pick-me-up.

Tall glass filled with shaken espresso, set on a wooden board.

I probably should have called this “Starbucks at home” week, because that’s what it has become.

Earlier this week I showed you how to make homemade versions of the brown sugar syrup and vanilla sweet cream cold foam. Today, we’re going to talk about making your own iced shaken espresso.

This drink has become super popular and I totally get why. As a iced coffee girl myself, it’s totally the type of coffee drink I love.

So even though I’ll still swing through the drive thru every now and then, it’s great to know how to make this at home for those days when I want to save money (or save myself a trip outside of the house).

(more…)

The post Iced Shaken Espresso appeared first on My Baking Addiction.

Vanilla Sweet Cream Cold Foam

Looking for the perfect coffee-shop finish to your iced coffee at home? Whip up this luxurious vanilla sweet cream cold foam! As much as I love cruising through the Starbucks drive-thru, I’ll admit that going there on a regular basis gets kind of expensive. The other day I discovered that a single slice of pumpkin …

The post Vanilla Sweet Cream Cold Foam appeared first on My Baking Addiction.

Looking for the perfect coffee-shop finish to your iced coffee at home? Whip up this luxurious vanilla sweet cream cold foam!

Close up of vanilla sweet cream cold foam dusted with cinnamon on top of a glass of iced coffee.

As much as I love cruising through the Starbucks drive-thru, I’ll admit that going there on a regular basis gets kind of expensive.

The other day I discovered that a single slice of pumpkin loaf costs almost $4 at Starbucks. But I can an entire batch of my pumpkin bread – which makes 2 whole loaves – for less than $7.50.

You get where I’m going? Those green cups are a great treat, but not a daily habit for me. 

So instead, I like finding ways to make some of my coffee-shop favorites at home. And if you like iced coffees as much as I do, this vanilla sweet cream cold brew is a must-try.

(more…)

The post Vanilla Sweet Cream Cold Foam appeared first on My Baking Addiction.

Brown Sugar Syrup

Make this easy and flavorful brown sugar syrup at home for mornings when you don’t have time to drive by the coffee shop. Its rich sweetness is the perfect accompaniment to your favorite coffees and teas. I love a morning coffee shop coffee or tea. Whether it’s hitting up my local coffee shop or swinging …

The post Brown Sugar Syrup appeared first on My Baking Addiction.

Make this easy and flavorful brown sugar syrup at home for mornings when you don’t have time to drive by the coffee shop. Its rich sweetness is the perfect accompaniment to your favorite coffees and teas.

Close up of brown sugar syrup in a glass jar on a wooden board.

I love a morning coffee shop coffee or tea. Whether it’s hitting up my local coffee shop or swinging through the Starbucks drive thru, it’s a great way to start my morning. Or get my second wind in the afternoon.

But doing that daily is not the best habit. It does add up after a while.

That’s why I like making homemade vanilla coffee syrup and keeping it on hand for dressing up my coffee at home. And once I became hooked on the Starbucks brown sugar syrup, I knew I had to come up with a homemade version of that, too.

(more…)

The post Brown Sugar Syrup appeared first on My Baking Addiction.

Is There Hope for Canned Cold Brew?

Over the next four years, the canned cold brew coffee market is expected to grow by more than $400 million, reaching a total valuation of $1.37 billion. This shouldn’t come as a surprise. In 2021, cold drinks accounted for 75 percent of Starbucks’ tota…
Over the next four years, the canned cold brew coffee market is expected to grow by more than $400 million, reaching a total valuation of $1.37 billion. This shouldn’t come as a surprise. In 2021, cold drinks accounted for 75 percent of Starbucks’ total beverage sales—a result that led CEO Howard Schultz to describe the company’s global cold coffee opportunity as “simply enormous.” And yet, despite its substantial tailwind, the consensus among my friends, co-workers, and online coffee communities (yes, these are separate groups), is that canned cold brew stinks.

When not canned, cold brew has a high approval rating among my coffee-drinking peers. As its name suggests, the beverage is brewed cold, a process that typically involves soaking coarsely ground coffee in water, steeping the mixture overnight, and then finely straining it. When brewed cold, coffee extracts slower, meaning it takes longer for the beans’ flavorful compounds to dissolve into water. The process impacts coffee’s flavor and chemical makeup, ultimately producing a beverage many describe as “smoother” than traditional, hot-brewed coffee.

Read More >>

Our 17 Favorite Hot Drinks to Battle Cold Winter Nights

At the conclusion of a frosty commute, when my toes and fingers and ears are numb, I throw off my bulky jacket and immediately pop a large mug of water in the microwave (I’m too impatient to wait for a kettle to boil). I’m already halfway to my favorit…

At the conclusion of a frosty commute, when my toes and fingers and ears are numb, I throw off my bulky jacket and immediately pop a large mug of water in the microwave (I'm too impatient to wait for a kettle to boil). I'm already halfway to my favorite way to warm up: a gigantic cup of fragrant, ruby rooibos. A warm drink (be it a cocktail or booze-free) first thaws my hands, but then builds a steady heat with each sip—sort of like a space heater for my insides. I'm partial to an aromatic mug of tea, but experiment with one of these 17 hot drinks to battle the cold.


Zero-Proof for Zero Temps

Read More >>

30 Coffee Gifts That Baristas Actually Like

Us coffee drinkers are an opinionated bunch. We all agree that we like coffee (or espresso), but as for how it should be made (pour-over vs. drip vs. French press vs. cold brew), well, that’s another story. While we love these passionate preferences, t…

Us coffee drinkers are an opinionated bunch. We all agree that we like coffee (or espresso), but as for how it should be made (pour-over vs. drip vs. French press vs. cold brew), well, that’s another story. While we love these passionate preferences, they can make coffee gift-giving quite the high wire act. In hopes of reducing this risk, we spoke to the most opinionated coffee lovers of all—baristas—to identify the best gifts for all types of coffee lovers.


Mugs & Cups

Read More >>

Individual Irish Coffee Chocolate Pudding Cakes

Individual Irish Coffee Chocolate Pudding Cakes

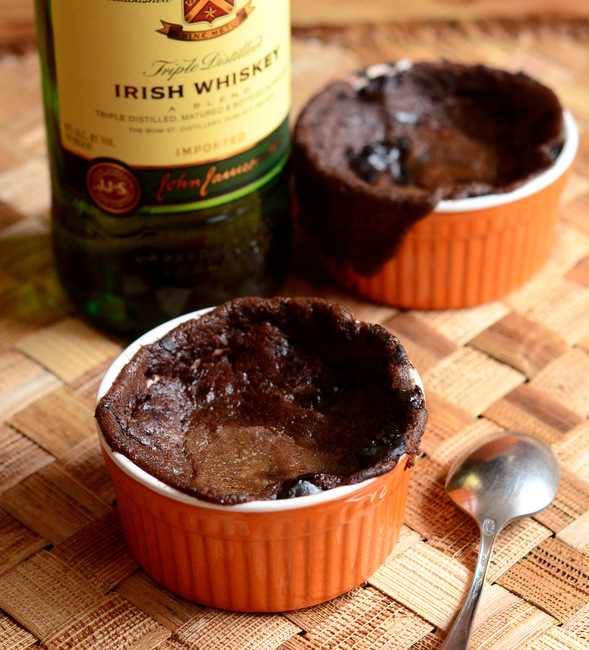
These Irish Coffee Chocolate Pudding Cakes are inspired by Irish coffee, a classic coffee drink made with whipped cream and Irish whiskey. The coffee drink will warm you up on a cold night and this dessert, served warm, will do the same.

Chocolate pudding cakes are wonderful desserts that are …

The post Individual Irish Coffee Chocolate Pudding Cakes appeared first on Baking Bites.

Individual Irish Coffee Chocolate Pudding Cakes

These Irish Coffee Chocolate Pudding Cakes are inspired by Irish coffee, a classic coffee drink made with whipped cream and Irish whiskey. The coffee drink will warm you up on a cold night and this dessert, served warm, will do the same.

Chocolate pudding cakes are wonderful desserts that are perfect for treating yourself on a lazy night in. They’re delicious and easy to make, with a two-part batter that bakes into a separate cake and sauce in one dish in the oven. Pudding cakes are often baked in large casserole dishes and are simply spooned out to serve. This casual presentation means that, while they’re certainly indulgent, they’re rarely anyone’s top choice for an elegant dinner party dessert. One way to give your pudding cakes a visual upgrade is to bake them in ramekins and turn one large casserole into decadent individual portions.

The Irish Coffee Chocolate Pudding Cakes start with a chocolate batter that uses cocoa powder for a deep, bittersweet chocolate flavor and a generous dose of instant espresso. The cake batter comes together very easily and is portioned into ramekins. Next, each portion if batter is topped with a topping that sinks beneath the cake and turns into a saucy “pudding” during baking.  I describe the sauce ingredients as a “topping” in the recipe below because the ingredients are not mixed together before they are added to the ramekins. Instead, they are simply added to the top of each cake (like a “topping”) and become a sauce as the cake bakes. The sauce includes a dose of Irish whiskey for each dessert and you’ll get a subtle hint of it in each serving, though this has much, much less alcohol per serving than the coffee cocktail does. Serve the pudding cakes warm for best results.

The pudding cakes will be nicely puffed when they come out of the oven but, like a souffle, they will fall as they cool. The steam in the airy cake keeps the cake rising high while it is in the oven, however the whole dessert is so moist (there is a pudding layer under there!) that it simply sinks slightly as it cools. You’ll still get the lovely layers of cake and sauce in every bite, however. I like to serve mine plain, but you can use the sunken cake to your advantage by filling the depression with a dollop of whipped cream or a small scoop of ice cream before serving.

Individual Irish Coffee Chocolate Pudding Cakes

Individual Irish Coffee Chocolate Pudding Cakes
Cake
3/4 cup all purpose flour
1 tsp baking powder
1/4 tsp salt
1/4 cup butter, room temperature
2/3 cup sugar
1/2 cup unsweetened cocoa powder
2 tsp instant espresso powder
or 1 tbsp instant coffee powder
1/2 tsp vanilla extract
1/2 cup milk

Topping
6 tbsp brown sugar
6 tsp (3 tbsp) unsweetened cocoa powder
6 tbsp Irish whiskey
3/4 cup hot coffee

Preheat oven to 350F. Place 6 8-oz ramekins on a baking sheet.
In a small bowl, whisk together flour, baking powder and salt.
In a large bowl, cream together butter and sugar. Beat in cocoa powder, instant espresso powder and vanilla extract until ingredients are well-combined. Stir in half of the flour mixture, followed by the milk. Stir in remaining flour mixture. Divide mixture evenly into prepared ramekins.
Top each ramekin with 1 tbsp brown sugar, 1 tsp cocoa powder, 1 tbsp Irish whisky and 2 tbsp hot coffee. Do not mix.
Place tray with ramekins in the oven and bake for about 20 minutes, until the tops of the puddings are set and the sauce is bubbling slightly around the edges of the ramekins.
Allow puddings to cool for at least 5-10 minutes before serving.

Serves 6.

The post Individual Irish Coffee Chocolate Pudding Cakes appeared first on Baking Bites.